| Second Battle of El Alamein | |||||||
|---|---|---|---|---|---|---|---|
| Part of the Western Desert campaign of the Second World War | |||||||
 24 October 1942: British soldiers in a posed attack | |||||||
| |||||||
| Belligerents | |||||||
|
|
Air support: | ||||||
| Commanders and leaders | |||||||
|
Ugo Cavallero Erwin Rommel Wilhelm von Thoma (POW) Georg Stumme † Curio Barbasetti di Prun Enea Navarini Giuseppe De Stefanis Enrico Frattini (POW) |
Harold Alexander Bernard Montgomery Oliver Leese Brian Horrocks Herbert Lumsden | ||||||
| Strength | |||||||
|
116,000[4][a] 547 tanks[b] 192 armoured cars[5] 770[7] – 900 aircraft[c] 552 artillery pieces[9] 496[d] – 1,063 anti-tank guns[11] |
195,000[5] 1,029 tanks[e] 435 armoured cars[5] 730[f] – 750 aircraft[g] 892[9] – 908 artillery guns[5] 1,451 anti-tank guns[5][h] | ||||||
| Casualties and losses | |||||||
|
2,000–9,000 dead or missing, 4,800–15,000 wounded, 35,000–49,000 captured[13] c. 500 tanks destroyed 254 artillery guns destroyed 84 aircraft destroyed |
13,560 killed, wounded, captured, and missing[13][i] 332–500 tanks destroyed 111 guns destroyed 97 aircraft destroyed[15] | ||||||
The Second Battle of El Alamein (23 October – 11 November 1942) was a battle of the Second World War that took place near the Egyptian railway halt of El Alamein. The First Battle of El Alamein and the Battle of Alam el Halfa had prevented the Axis from advancing further into Egypt.
In August 1942, General Claude Auchinleck had been relieved as Commander-in-Chief of Middle East Command and his successor, Lieutenant-General William Gott was killed on his way to replace him as commander of the Eighth Army. Lieutenant-General Bernard Montgomery was appointed and led the Eighth Army offensive.
The Allied victory at El Alamein was the beginning of the end of the Western Desert Campaign, eliminating the Axis threat to Egypt, the Suez Canal and the Middle Eastern and Persian oil fields. The battle revived the morale of the Allies, being the first big success against the Axis since Operation Crusader in late 1941. The end of the battle coincided with the Allied invasion of French North Africa in Operation Torch on 8 November, which opened a second front in North Africa.
Background edit
This section needs additional citations for verification. (November 2016) |

Panzer Army Africa (Panzerarmee Afrika/Armata Corazzata Africa, Generalfeldmarschall Erwin Rommel), composed of German and Italian tank and infantry units, had advanced into Egypt after its success at the Battle of Gazala (26 May – 21 June 1942). The Axis advance threatened British control of the Suez Canal, the Middle East and its oil resources. General Claude Auchinleck withdrew the Eighth Army to within 80 km (50 mi) of Alexandria where the Qattara Depression was 64 km (40 mi) south of El Alamein on the coast. The depression was impassable and meant that any attack had to be frontal; Axis attacks in the First Battle of El Alamein (1–27 July) had been defeated. Marshal Ugo Cavallero was temporarily made commander of Axis forces in Egypt, while Lieutenant-General Curio Barbasetti di Prun was the Italian commander of the Italian forces and Rommel had tactical control of the German and Italian forces at the front.[16][page needed][17][18]
Eighth Army counter-attacks in July also failed, as the Axis forces dug in and regrouped. Auchinleck called off the attacks at the end of July to rebuild the army. In early August, the Prime Minister, Winston Churchill and General Sir Alan Brooke, the Chief of the Imperial General Staff (CIGS), visited Cairo and replaced Auchinleck as Commander-in-chief Middle East Command with General Harold Alexander. Lieutenant-General William Gott was made commander of the Eighth Army but was killed when his transport aircraft was shot down by Luftwaffe fighters; Lieutenant-General Bernard Montgomery was flown from Britain to replace him.
Lacking reinforcements and depending on small, underdeveloped ports for supplies and aware of a huge Allied reinforcement operation for the Eighth Army, Rommel decided to attack first. The two armoured divisions of the Afrika Korps and the reconnaissance units of Panzerarmee Afrika led the attack but were repulsed at the Alam el Halfa ridge and Point 102 on 30 August 1942, during the Battle of Alam el Halfa; the Axis forces retired to their start lines. The short front line and secure flanks favoured the defensive and Rommel had time to develop the Axis fortifications, sowing minefields with c. 500,000 mines and miles of barbed wire.[19] Alexander and Montgomery intended to establish a superiority of force sufficient to achieve a breakthrough and exploit it to destroy Panzerarmee Afrika. Earlier in the Western Desert Campaign, neither side had been able to exploit a local victory sufficiently to defeat its opponent before it had withdrawn and transferred the problem of over-extended supply lines to the victor.
Until June 1942 Rommel had been receiving detailed information about the strength and movement of British forces from reports sent to Washington by Colonel Bonner Fellers, the U.S. military attaché in Cairo. The American code had been stolen following a covert operation by Italian military intelligence at the American Embassy in Rome the previous year. Despite British concerns, the Americans continued to use the code until the end of June. Suspicion that the code was compromised was confirmed when the 9th Australian Division captured the German 621st Signal Battalion in July 1942.[20]
The British gained the intelligence advantage because Ultra and local sources exposed the Axis order of battle, its supply position and intentions. A reorganisation of military intelligence in Africa in July had also improved the integration of information received from all sources and the speed of its dissemination.[21] With rare exceptions, intelligence identified the supply ships destined for North Africa, their location or routing and in most cases their cargoes, allowing them to be attacked.[22] By 25 October, Panzerarmee Afrika was down to three days' supply of fuel, only two days' of which were east of Tobruk. Harry Hinsley, the official historian of British intelligence, wrote in 1981 that "The Panzer Army... did not possess the operational freedom of movement that was absolutely essential in consideration of the fact that the British offensive can be expected to start any day".[23] Submarine and air transport somewhat eased the shortage of ammunition and by late October, there was sixteen days' supply at the front.[23] After six more weeks, the Eighth Army was ready; 195,000 men and 1,029 tanks began the offensive against the 116,000 men and 547 tanks of the Panzerarmee.
Prelude edit
British plan edit
Operation Lightfoot edit
Montgomery's plan was for a main attack to the north of the line and a secondary attack to the south, involving XXX Corps (Lieutenant-General Oliver Leese) and XIII Corps (Lieutenant-General Brian Horrocks), while X Corps (Lieutenant-General Herbert Lumsden) was to exploit the success.[24] With Operation Lightfoot, Montgomery intended to cut two corridors through the Axis minefields in the north. One corridor was to run south-west through the 2nd New Zealand Division sector towards the centre of Miteirya Ridge, while the second was to run west, passing 2 mi (3.2 km) north of the west end of the Miteirya Ridge across the 9th Australian and 51st (Highland) Division sectors.[25] Tanks would then pass through and defeat the German armour. Diversions at Ruweisat Ridge in the centre and also the south of the line would keep the rest of the Axis forces from moving northwards. Montgomery expected a 12-day battle in three stages: the break-in, the dogfight and the final breaking of the enemy.[26]
For the first night of the offensive, Montgomery planned for four infantry divisions of XXX Corps to advance on a 16 mi (26 km) front to the Oxalic Line, over-running the forward Axis defences. Engineers would clear and mark the two lanes through the minefields, through which the armoured divisions from X Corps would pass to gain the Pierson Line. They would rally and consolidate their position just west of the infantry positions, blocking an Axis tank counter-attack. The British tanks would then advance to Skinflint, astride the north–south Rahman Track deep in the Axis defensive system, to challenge the Axis armour.[25] The infantry battle would continue as the Eighth Army infantry "crumbled" the deep Axis defensive fortifications (three successive lines of fortification had been constructed) and destroy any tanks that attacked them.[27][j]
Operation Bertram edit
Before the battle the Commonwealth forces practised deceptions, in Operation Bertram, to confuse the Axis command as to where and when the battle was to occur. In September, they dumped waste materials (discarded packing cases, etc.) under camouflage nets in the northern sector, making them appear to be ammunition or ration dumps. The Axis naturally noticed these but as no offensive action immediately followed and the "dumps" did not change in appearance, they were subsequently ignored. This allowed the Eighth Army to build up supplies in the forward area unnoticed by the Axis, by replacing the rubbish with ammunition, petrol and rations at night. A dummy pipeline was built, hopefully leading the Axis to believe the attack would occur much later than it did and much further south. Dummy tanks consisting of plywood frames placed over jeeps were built and deployed in the south. In a reverse feint, the tanks destined for battle in the north were disguised as supply trucks by placing removable plywood superstructures over them.[29]
Operation Braganza edit
As a preliminary, the 131st (Queen's) Infantry Brigade of the 44th (Home Counties) Infantry Division, supported by tanks from the 4th Armoured Brigade, launched Operation Braganza attacking the paratroopers of the 185th Paratroopers Division "Folgore" on the night of 29/30 September in an attempt to capture the Deir el Munassib area. The Italian paratroopers repelled the attack, killing or capturing over 300 of the attackers.[30] It was wrongly assumed that Fallschirmjäger (German paratroopers) had manned the defences and been responsible for the British reverse. The Afrika Korps war diary notes that the Italian paratrooper unit "bore the brunt of the attack. It fought well and inflicted heavy losses on the enemy."[31]
Axis plan edit

With the failure of their offensive at the Battle of Alam el Halfa, the Axis forces went onto the defensive but losses had not been excessive. The Axis supply line from Tripoli was extremely long and captured British supplies and equipment had been exhausted, but Rommel decided to advance into Egypt.[32][33]
The Eighth Army was being supplied with men and materials from the United Kingdom, India, Australia and New Zealand, as well as with trucks and the new Sherman tanks from the United States. Rommel continued to request equipment, supplies and fuel but the priority of the German war effort was the Eastern Front and very limited supplies reached North Africa. Rommel was ill and in early September, arrangements were made for him to return to Germany on sick leave and for General der Panzertruppe Georg Stumme to transfer from the Russian front to take his place. Before he left for Germany on 23 September, Rommel organised the defence and wrote a long appreciation of the situation to Oberkommando der Wehrmacht (OKW armed forces high command), once again setting out the essential needs of the Panzer Army.[34]

Rommel knew that the British and Commonwealth forces would soon be strong enough to attack. His only hope now relied on the German forces fighting in the Battle of Stalingrad quickly to defeat the Red Army, then move south through the Trans-Caucasus and threaten Iran (Persia) and the Middle East. If successful, large numbers of British and Commonwealth forces would have to be sent from the Egyptian front to reinforce the Ninth Army in Iran, leading to the postponement of any offensive against his army. Rommel hoped to convince OKW to reinforce his forces for the eventual link-up between Panzerarmee Afrika and the German armies fighting in southern Russia, enabling them finally to defeat the British and Commonwealth armies in North Africa and the Middle East.
In the meantime, the Panzerarmee dug in and waited for the attack by the Eighth Army or the defeat of the Red Army at Stalingrad. Rommel added depth to his defences by creating at least two belts of mines about 3.1 mi (5 km) apart, connected at intervals to create boxes (Devil's gardens) which would restrict enemy penetration and deprive British armour of room for manoeuvre. The front face of each box was lightly held by battle outposts and the rest of the box was unoccupied but sowed with mines and explosive traps and covered by enfilading fire.[35] The main defensive positions were built to a depth of at least 2 km (1.2 mi) behind the second mine belt.[36] The Axis laid around half a million mines, mostly Teller anti-tank mines with some smaller anti-personnel types (such as the S-mine). (Many of these mines were British and had been captured at Tobruk). To lure enemy vehicles into the minefields, the Italians dragged an axle and tyres through the fields using a long rope to create what appeared to be well-used tracks.[19]

Rommel did not want the British armour to break out into the open because he had neither the strength of numbers nor fuel to match them in a battle of manoeuvre. The battle had to be fought in the fortified zones; a breakthrough had to be defeated quickly. Rommel stiffened his forward lines by alternating German and Italian infantry formations. Because the British deception confused the Axis as to the point of attack, Rommel departed from his usual practice of holding his armoured strength in a concentrated reserve and split it into a northern group (15th Panzer Division and 133rd Armoured Division "Littorio") and a southern group (21st Panzer Division and 132nd Armoured Division "Ariete"), each organised into battle groups to be able to make a quick armoured intervention wherever the blow fell and prevent narrow breakthroughs from being enlarged. A significant proportion of his armoured reserve was dispersed and held unusually far forward. The 15th Panzer Division had 125 operational tanks (16 Pz.IIs, 43 Pz.III Ausf H, 43 Pz.III Ausf J, 6 Pz.IV Ausf D, 15 Pz.IV Ausf F) while the 21st Panzer Division had 121 operational combat vehicles (12 Pz.IIs, 38 Pz.III Ausf H, 43 Pz.III Ausf J, 2 Pz.IV Ausf D, 15 Pz.IV Ausf F).[37]
Rommel held the 90th Light Division further back and kept the 101st Motorised Division "Trieste" in reserve near the coast.[38] Rommel hoped to move his troops faster than the Allies, to concentrate his defences at the most important point (Schwerpunkt) but lack of fuel meant that once the Panzerarmee had concentrated, it would not be able to move again because of lack of fuel.[39] The British were well aware that Rommel would be unable to mount a defence based on his usual manoeuvre tactics but no clear picture emerged of how he would fight the battle and British plans seriously underestimated the Axis defences and the fighting power of the Panzerarmee.[40]
Battle edit
| Maps showing stages of the battle | |
|---|---|
| |


Phase one: the break-in edit

Prior to the main barrage, there was a diversion by the 24th Australian Brigade, which involved the 15th Panzer Division being subjected to heavy fire for a few minutes.[41] Then at 21:40 (Egyptian Summer Time) on 23 October[42] on a calm, clear evening under the bright sky of a full moon, Operation Lightfoot began with a 1,000-gun barrage. The fire plan had been arranged so that the first rounds from the 882 guns from the field and medium batteries would land along the 40 mi (64 km) front at the same time.[43] After twenty minutes of general bombardment, the guns switched to precision targets in support of the advancing infantry.[44] The shelling plan continued for five and a half hours, by the end of which each gun had fired about 600 rounds, about 529,000 shells.
Operation Lightfoot alluded to the infantry attacking first. Anti-tank mines would not be tripped by soldiers stepping on them since they were too light. As the infantry advanced, engineers had to clear a path for the tanks coming behind. Each gap was to be 24 ft (7.3 m) wide, which was just enough to get tanks through in single file. The engineers had to clear a 5 mi (8.0 km) route through the Devil's Gardens. It was a difficult task that was not achieved because of the depth of the Axis minefields.

At 22:00, the four infantry divisions of XXX Corps began to move. The objective was to establish a bridgehead before dawn at the imaginary line in the desert where the strongest enemy defences were situated, on the far side of the second mine belt. Once the infantry reached the first minefields, the mine sweepers, including Reconnaissance Corps troops and sappers, moved in to create a passage for the armoured divisions of X Corps. Progress was slower than planned but at 02:00, the first of the 500 tanks crawled forward. By 04:00, the lead tanks were in the minefields, where they stirred up so much dust that there was no visibility at all, traffic jams developed and tanks bogged down. Only about half of the infantry attained their objectives and none of the tanks broke through.[45]
The 1st South African Division, on the left flank of XXX Corps, attacked on a two-brigade front to secure the southern end of Miteirya Ridge, with the 2nd South African Infantry Brigade on the right and the 3rd South African Infantry Brigade on the left. The 1st South African Infantry Brigade was deployed further south to create an anti-tank screen for the protection of the left flank of the attack. By 08:00 on 24 October, Miteirya Ridge was secured after a night of heavy fighting and a high number of casualties.[46]

The 7th Armoured Division (with a Free French Brigade under command) from XIII Corps (Lieutenant-General Brian Horrocks) made a secondary attack to the south. The main attack aimed to achieve a breakthrough, engage and pin down the 21st Panzer Division and the "Ariete" Division around Jebel Kalakh, while the Free French on the far left were to secure Qaret el Himeimat and the el Taqa plateau.[25] The right flank of the attack was to be protected by 44th Infantry Division with the 131st Infantry Brigade. The attack met determined resistance, mainly from the 185th Infantry Division "Folgore", part of the Ramcke Parachute Brigade and Gruppe Keil.[47][48]
The minefields were deeper than anticipated and clearing paths through them was impeded by Axis defensive fire. By dawn on 24 October, paths still had not been cleared through the second minefield to release the 22nd and 4th Light Armoured Brigades into the open to make their planned turn north into the rear of enemy positions 5 mi (8.0 km) west of Deir el Munassib.[25] Further north along the XIII Corps front, the 50th (Northumbrian) Infantry Division achieved a limited and costly success against determined resistance from the 17th Infantry Division "Pavia", 27th Infantry Division "Brescia" and elements of the 185th Infantry Division "Folgore".[49] The 4th Indian Infantry Division, on the far left of the XXX Corps front at Ruweisat Ridge, made a mock attack and two small raids to deflect attention to the centre of the front.[50]
Phase two: the crumbling edit

Dawn aerial reconnaissance showed little change in Axis dispositions and Montgomery ordered that the clearance of the northern corridor should be completed and the New Zealand Division supported by the 10th Armoured Division should push south from Miteirya Ridge. The 9th Australian Division, in the north, should plan a crumbling operation for that night, while in the southern sector, 7th Armoured Division should continue to try to break through the minefields with support, if necessary, from the 44th Division.[51] Panzer units counter-attacked the 51st Highland Division just after sunrise, only to be stopped in their tracks.

The morning of Saturday 24 October brought disaster for the German headquarters. The Axis forces were stunned by British attack and their messages became confused and hysterical, with one Italian unit communicating to Germans that it had been wiped out by "drunken negroes with tanks".[52] The reports that Stumme had received that morning showed the attacks had been on a broad front but that such penetration as had occurred should be containable by local units. He went forward to see for himself and finding himself under fire, suffered a heart attack and died.
Temporary command was given to Major-General Wilhelm Ritter von Thoma. Hitler had already decided that Rommel should leave his sanatorium and return to North Africa. Rommel flew to Rome early on 25 October to press Comando Supremo for more fuel and ammunition and then on to North Africa to resume command that night of the Panzer Army Africa, renamed the German-Italian Panzer Army (Deutsch-Italienische Panzerarmee) that day.[53] Rommel's arrival boosted German morale, though there was little he could do to change the course of the battle.[54] There was little activity during the day, pending complete clearance of paths through the minefields. The armour was held at the Oxalic Line.[26] Artillery and the Desert Air Force, making over 1,000 sorties, attacked Axis positions all day to aid the 'crumbling' of the Axis forces. By 16:00 there was little progress.[51]
At dusk, with the sun at their backs, Axis tanks from the 15th Panzer Division and the "Littorio" Division swung out from the Kidney feature (also known to the Germans and Italians as Hill 28), often wrongly called a ridge as it was actually a depression, to engage the 1st Armoured Division and the first big tank engagement of El Alamein began. Over 100 tanks were involved and half were destroyed by dark; neither position was altered.[55]

At around 10:00, Axis aircraft had destroyed a convoy of 25 British vehicles carrying petrol and ammunition, setting off a night-long blaze; Lumsden wanted to call off the attack but Montgomery overruled him.[56] The thrust that night by the 10th Armoured Division from Miteirya Ridge failed. The lifting of mines on the Miteirya Ridge and beyond took far longer than planned and the leading unit, the 8th Armoured Brigade, was caught on their start line at 22:00—zero hour—by an air attack and were scattered. By the time they had reorganised they were well behind schedule and out of touch with the creeping artillery barrage. By daylight the brigade was caught in the open, suffering considerable fire from well sited tanks and anti-tank guns. The 24th Armoured Brigade had pushed forward and reported at dawn they were on the Pierson Line, although it turned out that, in the dust and confusion, they had mistaken their position and were well short.[57]
The attack in the XIII Corps sector to the south fared no better. The 131st Infantry Brigade cleared a path through the mines but when the 22nd Armoured Brigade passed through, they came under heavy fire and were repulsed, with 31 tanks disabled. British air activity that night focused on Rommel's northern armoured group, where 135 short tons (122 t) of bombs were dropped. To prevent a recurrence of 8th Armoured Brigade's experience from the air, attacks on Axis landing fields were also stepped up.[57]
D + 2: 25 October edit
The first attack had ended by Sunday. The British had advanced through the minefields in the west to make a 6 mi (9.7 km) wide and 5 mi (8.0 km) deep inroad. They were on top of Miteirya Ridge in the south-east. Axis forces were firmly entrenched in most of their original battle positions and the attack had been contained. Montgomery decided that the planned advance southward from Miteirya Ridge by the New Zealanders would be too costly and instead decided that XXX Corps—while keeping firm hold of Miteirya—should strike northwards toward the coast with the 9th Australian Division. The 1st Armoured Division—on the Australian left—should continue to attack west and north-west; activity to the south on both corps fronts would be confined to patrolling.[58] The battle would be concentrated at the Kidney feature and Tel el Eisa until a breakthrough occurred.

By early morning, the Axis forces launched attacks using the 15th Panzer and "Littorio" divisions. The Panzer Army probed for a weakness but without success. The British and Commonwealth infantry attacked at dusk. Around midnight, the 51st (Highland) Division launched three attacks but no one knew quite where they were. Pandemonium and carnage ensued, resulting in the loss of over 500 British troops and leaving only one officer among the attacking force. While the 51st Highland Division was operating around the Kidney feature, the Australians were attacking Point 29 (sometimes shown on Axis maps as "28") a 20 ft (6.1 m) high Axis artillery observation post south-west of Tel el Eisa, to surround the Axis coastal salient containing the German 164th Light Division and large numbers of Italian infantry.[59][60]
This was the new northern thrust Montgomery had devised earlier in the day. The 26th Australian Brigade attacked at midnight, supported by artillery and 30 tanks of the 40th Royal Tank Regiment.[61] The Australians took the position and 240 prisoners. Fighting continued in this area for the next week, as the Axis tried to recover the small hill that was so important to their defence. Night bombers dropped 115 long tons (117 t) of bombs on targets in the battlefield and 14 long tons (14 t) on the Stuka base at Sidi Haneish, while night fighters flew patrols over the battle area and the Axis forward landing grounds.[61] In the south, the 4th Armoured Brigade and the 69th Infantry Brigade attacked the 187th Paratroopers Regiment "Folgore" at Deir Munassib, but lost about 20 tanks gaining only the forward positions.[62][63]
Phase three: the counter edit
D + 3: 26 October edit

Rommel, on his return to North Africa on the evening of 25 October, assessed the battle. Casualties, particularly in the north, as a result of incessant artillery and air attack, had been severe. The Italian 102nd Motorised Division "Trento" had lost 50 per cent of its infantry and most of its artillery and the 164th Light Division had lost two battalions. The 15th Panzer and Littorio divisions had prevented the British tanks from breaking through but this had been a costly defensive success, the 15th Panzer Division being reduced to 31 tanks.[53][64] Most other units were also under strength, on half rations and many men were ill; Panzerarmee Afrika had only enough fuel for three days.[23]
Rommel was convinced by this time that the main assault would come in the north and determined to retake Point 29.[65] He ordered a counter-attack against it by the 15th Panzer Division and the 164th Light Division, with part of the Italian XX Corps to begin at 15:00 but under constant artillery and air attack this came to nothing.[66] According to Rommel this attack did meet some success, with the Italians recapturing part of Hill 28,
Attacks were now launched on Hill 28 by elements of the 15th Panzer Division, the Littorio and a Bersaglieri Battalion, supported by the concentrated fire of all the local artillery and AA. In the evening part of the Bersaglieri Battalion succeeded in occupying the eastern and western edges of the hill.[67]

The bulk of the 2/17th Australian Battalion, which had defended the position, was forced to retreat.[68] Rommel reversed his policy of distributing his armour across the front, ordering the 90th Light Division forward from Ed Daba and 21st Panzer Division north along with one third of the Ariete Division and half the artillery from the southern sector to join the 15th Panzer Division and the Littorio Division. The move could not be reversed because of the fuel shortage.[69] The Trieste Division was ordered from Fuka to replace the 90th Light Division at Ed Daba but the 21st Panzer Division and the Ariete Division made slow progress during the night under constant attack from DAF bombers.[70]
At the Kidney feature, the British failed to take advantage of the absent tanks; each time they tried to move forward they were stopped by anti-tank guns. Churchill railed, "Is it really impossible to find a general who can win a battle?" [71] Bristol Beaufort torpedo bombers of 42 Squadron, attached to 47 Squadron, sank the tanker Proserpina at Tobruk; three Vickers Wellington torpedo bombers of 38 Squadron destroyed the oil tanker Tergestea at Tobruk during the night, removing the last hope for refuelling the Panzerarmee.
By 26 October, XXX Corps had completed the capture of the bridgehead west of the second mine belt. The British Forces had sustained 2000 casualties, the Australians 1000, the New Zealanders 1000 and the South Africans 600.[46] The tanks of X Corps, established just beyond the infantry, had failed to break through the Axis anti-tank defences.[45] Montgomery decided that over the next two days, while continuing the process of attrition, he would thin out his front line to create a reserve for another attack. The reserve was to include the 2nd New Zealand Division (with the 9th Armoured Brigade under command), the 10th Armoured Division and the 7th Armoured Division.[72]
The attacks in the south, which lasted three days and caused considerable losses without achieving a breakthrough, were suspended.
D + 4: 27 October edit

The main battle was concentrated around Tel el Aqqaqir and the Kidney feature at the end of the 1st Armoured Division's path through the minefield. A mile north-west of the feature was Outpost Woodcock and roughly the same distance south-west lay Outpost Snipe. An attack was planned on these areas using two battalions from 7th Motor Brigade. At 23:00 on 26 October 2 Battalion, The Rifle Brigade would attack Snipe and 2nd Battalion King's Royal Rifle Corps (KRRC) would attack Woodcock. The plan was for 2nd Armoured Brigade to pass round the north of Woodcock the following dawn and 24th Armoured Brigade round the south of Snipe. The attack was to be supported by all the artillery of X and XXX Corps.[73]
Both battalions had difficulty finding their way in the dark and dust. At dawn, the KRRC had not reached its objective and had to find cover and dig in some distance from Woodcock. The 2nd Rifle Brigade had been more fortunate and after following the shell bursts of the supporting artillery, dug in when they concluded they had reached their objective having encountered little opposition.[74]
At 06:00, the 2nd Armoured Brigade commenced its advance and ran into such stiff opposition that, by noon, it had still not linked with the KRRC. The 24th Armoured Brigade started a little later and was soon in contact with the Rifle Brigade (having shelled them in error for a while). Some hours of confused fighting ensued involving tanks from the Littorio and troops and anti-tank guns from 15th Panzer which managed to keep the British armour at bay in spite of the support of the anti-tank guns of the Rifle Brigade battle group. Rommel had decided to make two counter-attacks using his fresh troops. 90th Light Division was to make a fresh attempt to capture Point 29 and 21st Panzer were targeted at Snipe (the Ariete detachment had returned south).[75]
At Snipe, mortar and shellfire was constant all day and at 16:00, Rommel launched his major attack. German and Italian tanks moved forward against the Rifle Brigade which had thirteen 6-pounder anti-tank guns along with six more from the 239th Anti-Tank Battery, RA. Although on the point of being overrun more than once they held their ground, destroying 22 German and 10 Italian tanks. The Germans gave up but in error the British battle group was withdrawn without being replaced that evening. Its CO, Lieutenant-Colonel Victor Buller Turner, was awarded the Victoria Cross.[76] Only one anti-tank gun—from 239 Battery—was brought back.[77]
When it was discovered that neither Woodcock nor Snipe was in Eighth Army hands, the 133rd Lorried Infantry Brigade was sent to capture them. By 01:30 on 28 October, the 4th battalion Royal Sussex Regiment judged they were on Woodcock and dug in. At dawn, the 2nd Armoured Brigade moved up in support but before contact could be made the 4th Royal Sussex were counter-attacked and overrun with many losses. The 133rd Lorried Brigade's two other battalions had moved on Snipe and dug in, only to find out the next day that they were in fact well short of their objective.[78]
Further north, the attack by the 90th Light Division attack on Point 29 during the afternoon of 27 October failed under heavy artillery and bombing which broke up the attack before it had closed with the Australians. The action at Snipe was an episode of the Battle of El Alamein described by the regimental historian as the most famous day of the regiment's war.[79] Lucas-Phillips, in his Alamein wrote:
The desert was quivering with heat. The gun detachments and the platoons squatted in their pits and trenches, the sweat running in rivers down their dust-caked faces. There was a terrible stench. The flies swarmed in black clouds upon the dead bodies and excreta and tormented the wounded. The place was strewn with burning tanks and carriers, wrecked guns and vehicles, and over all drifted the smoke and the dust from bursting high explosives and from the blasts of guns.
— Lucas-Phillips, [80]
D + 5–6: 28–29 October edit

On 28 October, the 15th and 21st Panzer made a determined attack on the X Corps front but were halted by artillery, tank and anti-tank gun fire. In the afternoon, they paused to regroup to attack again but they were bombed for two and a half hours and were prevented from even forming up.[81] This proved to be Rommel's last attempt to take the initiative and as such his defeat here represented a turning point in the battle.[82]
At this point, Montgomery ordered the X Corps formations in the area of Woodcock and Snipe to go over to the defensive while he concentrated the attack further to the north. Late on 27 October, the 133rd Brigade Lorried Infantry Brigade was sent forward to recover lost positions but the next day, a good part of this force was overrun by German and Italian tanks from the Littorio and supporting 12th Bersaglieri Regiment; several hundred British soldiers were captured.[83] On the night of 28/29 October, the 9th Australian Division was ordered to make a second set-piece attack. The 20th Australian Infantry Brigade with the 40th R.T.R. in support would push north-west from Point 29 to form a base for the 26th Australian Infantry Brigade with the 46th R.T.R. in support, to attack north-east to an Axis position south of the railway known as Thompson's Post. Once Thompson's Post was captured, the Australians were to cross the railway to the coast road and advance south-east to close on the rear of the Axis troops in the coastal salient. An attack by the third brigade would then be launched on the salient from the south-east.[84]
The 20th Brigade took its objectives with little trouble but 26th Brigade had difficulty. Because of the distances involved, the troops were riding on the Valentine tanks of the 46th R.T.R. and carriers, which mines and anti-tank guns soon brought to grief, forcing the infantry to dismount. The infantry and tanks lost touch, fighting with the 125th Panzergrenadier Regiment and a battalion of the 7th Bersaglieri Regiment sent to reinforce the sector; the advance came to a halt.[84] The Australians suffered 200 casualties in that attack and suffered 27 killed and 290 wounded.[85] The German and Italian forces that had participated in the counter-attack formed an outpost and held on until the arrival of German reinforcements on 1 November.

It became clear that there were no longer enough hours of darkness left to reform, continue the attack and see it to its conclusion, so the operation was called off. By the end of these engagements in late October, the British still had 800 serviceable tanks and the Panzerarmee day report for 28 October (intercepted and read by Eighth Army the following evening) recorded 81 serviceable German tanks and 197 Italian.[82] With the help of signals intelligence information the Proserpina (carrying 4,500 tonnes of fuel) and Tergestea (carrying 1,000 tonnes of fuel and 1,000 tonnes of ammunition) had been destroyed on 26 October and the tanker Luisiano (carrying 2,500 tonnes of fuel) had been sunk off the west coast of Greece by a torpedo from a Wellington bomber on 28 October.[86] Rommel told his commanders, "It will be quite impossible for us to disengage from the enemy. There is no gasoline for such a manoeuvre. We have only one choice and that is to fight to the end at Alamein".[87]
The Australian and British attacks had alerted Montgomery that Rommel had committed his reserve, the 90th Light Division, to the front and that its presence in the coastal sector suggested that Rommel was expecting the next major Eighth Army offensive there. Montgomery decided to attack further south on a 4,000 yd (2.3 mi; 3.7 km) front south of Point 29. The attack was to take place on the night of 31 October/1 November, as soon as he had completed the reorganisation of his front line to create reserves for the offensive (although in the event it was postponed by 24 hours). To keep Rommel's attention on the coastal sector, Montgomery ordered the renewal of the 9th Australian Division operation on the night of 30/31 October.[88]
D + 7–9: 30 October – 1 November edit

The night of 30 October saw the third Australian attempt to reach the paved road and by the end of the night they were astride the road and the railway, making the position of the Axis troops in the salient precarious. A battlegroup from the 21st Panzer Division launched four attacks against Thompson's Post on 31 October, all being repulsed. Sergeant William Kibby (2/48th Australian Infantry Battalion) who, for his actions from 23 October until his death on the 31 October, including a lone attack on a machine-gun position at his own initiative, was awarded the Victoria Cross (posthumous). On 1 November, contact with Panzergrenadier-Regiment 125 in the nose of the salient was restored; the supporting X Bersaglieri Battalion resisted several Australian attacks.[89][90]
On 1 November, the tankers Tripolino and Ostia were torpedoed and sunk by aircraft, north-west of Tobruk. The shortage forced Rommel to rely increasingly on fuel flown in from Crete on the orders of Albert Kesselring, Luftwaffe Oberbefehlshaber Süd (OB Süd, Supreme Commander South), despite the restrictions imposed by the bombing of the airfields in Crete and Desert Air Force interceptions of the transport aircraft.[91] Rommel began to plan a retirement to Fuka, some 50 mi (80 km) to the west, as he had only 90 tanks remaining, against 800 British tanks.[64] Large amounts of fuel arrived at Benghazi after the German forces had started to retreat but little of it reached the front, a fact Kesselring tried to change by delivering it more closely to the fighting forces.[92]
Phase four: Operation Supercharge edit
D + 10: 2 November edit
.jpg)
This phase of the battle began at 01:00 on 2 November, with the objective of destroying enemy armour, forcing the enemy to fight in the open, reducing the Axis stock of petrol, attacking and occupying enemy supply routes, and causing the disintegration of the enemy army. The intensity and the destruction in Supercharge were greater than anything witnessed so far during this battle. The objective of this operation was Tel el Aqqaqir, the base of the Axis defence roughly 3 mi (4.8 km) north-west of the Kidney feature and situated on the Rahman lateral track.[93]
The initial thrust of Supercharge was to be carried out by the 2nd New Zealand Division. Lieutenant-General Bernard Freyberg had tried to free them of this task, as they had lost 1,405 men in just three days, at El Ruweisat Ridge in July. Along with the 5th New Zealand Infantry Brigade and 28th (Maori) Infantry Battalion, the division was to have had placed under its command the 151st (Durham) Brigade from the 50th (Northumbrian) Infantry Division, the 152nd (Seaforth and Camerons) Brigade from the 51st (Highland) Division and the 133rd Royal Sussex Lorried Infantry Brigade and the 9th Armoured Brigade under command.[94]
As in Operation Lightfoot, it was planned that two infantry brigades (the 151st on the right and 152nd on the left) each this time supported by a regiment of tanks—the 8th and 50th Royal Tank Regiments—would advance and clear a path through the mines. Once they reached their objectives, 4,000 yd (3,700 m) distant, 9th Armoured Brigade would pass through supported by a heavy artillery barrage and break open a gap in the Axis defences on and around the Rahman track, some 2,000 yd (1,800 m) further forward, which the 1st Armoured Division, following behind, would pass through into the open to take on Rommel's armoured reserves.[94] Rommel had ordered 21st Panzer Division from the front line on 31 October to form a mobile counterattacking force. The division had left behind a panzergrenadier regiment which would bolster the "Trieste" Division which had been ordered forward to replace it. Rommel had also interspersed formations from the Trieste and 15th Panzer Divisions to "corset" his weaker forces in the front line. On 1 November the two German armoured divisions had 102 effective tanks to face Supercharge and the Littorio and Trieste Divisions had 65 tanks between them.[95]
Supercharge started with a seven-hour aerial bombardment focused on Tel el Aqqaqir and Sidi Abd el Rahman, followed by a four and a half-hour barrage of 360 guns firing 15,000 shells.[96][better source needed] The two assault brigades started their attack at 01:05 on 2 November and gained most of their objectives to schedule and with moderate losses. One battalion from the 90th Light Division along with another battalion from the 15th Panzer Division were soon overrun and at 04:45 it was reported that only one Bersaglieri infantry battalioon was still manning the defensive line.[k] On the right of the main attack 28th (Maori) battalion captured positions to protect the right flank of the newly formed salient and 133rd Lorried Infantry did the same on the left. New Zealand engineers cleared five lines through the mines allowing the Royal Dragoons armoured car regiment to slip out into the open and spend the day raiding the Axis communications.[98]
The 9th Armoured Brigade had started its approach march at 20:00 on 1 November from El Alamein railway station with around 130 tanks and arrived at its start line with only 94 runners (operational tanks). The brigade was to have started its attack towards Tel el Aqqaqir at 05:45 behind a barrage; the attack was postponed for 30 minutes while the brigade regrouped on Currie's orders.[99] At 06:15, 30 minutes before dawn, the three regiments of the brigade advanced towards the gun line.[100]
We all realise that for armour to attack a wall of guns sounds like another Balaclava, it is properly an infantry job. But there are no more infantry available. So our armour must do it.
— Lieutenant General Sir Bernard Freyberg[101]
Brigadier Currie had tried to get the brigade out of doing this job, stating that he believed the brigade would be attacking on too wide a front with no reserves and that they would most likely have 50 per cent losses.[101]
The reply came from Freyberg that Montgomery
... was aware of the risk and has accepted the possibility of losing 100% casualties in the 9th Armoured Brigade to make the break, but in view of the promise of immediate following through of the 1st Armoured Division, the risk was not considered as great as all that.
— Freyberg[101]
The German and Italian anti-tank guns (mostly Pak38 and Italian 47 mm guns, along with 24 of the formidable 88 mm flak guns) opened fire upon the charging tanks silhouetted by the rising sun.[102][101] German tanks, which had penetrated between the Warwickshire Yeomanry and Royal Wiltshire Yeomanry, also caused many casualties. British tanks attacking the Folgore sector were fought off with petrol bombs and mortar fire as well as with the obsolete Italian 47 mm guns. The Axis gun screen started to inflict a steady amount of damage upon the advancing tanks but was unable to stop them; over the course of the next 30 minutes, around 35 guns were destroyed and several hundred prisoners taken. The 9th Armoured Brigade had started the attack with 94 tanks and was reduced to only 14 runners, of the 400 crews involved in the attack, 230 had been killed, wounded or captured. [103] [104]

If the British armour owed any debt to the infantry of the Eighth Army, the debt was paid on November 2 by 9th Armoured in heroism and blood.[105]
— Bernard Montgomery, referring to the mistakes of the British armoured forces during the First Battle of El Alamein
After the Brigade's action, Brigadier Gentry of 6th New Zealand Brigade went ahead to survey the scene. On seeing Brigadier Currie asleep on a stretcher, he approached him saying, "Sorry to wake you John, but I'd like to know where your tanks are?" Currie waved his hand at a group of tanks around him and replied "There they are". Gentry said "I don't mean your headquarters tanks, I mean your armoured regiments. Where are they?" Currie waved his arm and again replied, "There are my armoured regiments, Bill".[106]
The brigade had sacrificed itself upon the gun line and caused great damage but had failed to create the gap for the 1st Armoured Division to pass through; however, soon after dawn 1st Armoured Division started to deploy and the remains of 9th Armoured Brigade came under its command. 2nd Armoured Brigade came up behind the 9th, and by mid-morning 8th Armoured Brigade had come up on its left, ordered to advance to the south-west.[103] In heavy fighting during the day the British armour made little further progress. At 11:00 on 2 November, the remains of 15th Panzer, 21st Panzer and Littorio divisions counter-attacked 1st Armoured Division and the remains of 9th Armoured Brigade, which by that time had dug in with a screen of anti-tank guns and artillery together with intensive air support. The counter-attack failed under a blanket of shells and bombs, resulting in a loss of some 100 tanks.[104]

Although X Corps had failed in its attempt to break out, it had succeeded in its objective of finding and destroying enemy tanks. Although tank losses were approximately equal, this represented only a portion of the total British armour, but most of Rommel's tanks; the Afrika Korps strength of tanks fit for battle fell by 70 while in addition to the losses of the 9th Armoured Brigade, the 2nd and 8th Armoured Brigades lost 14 tanks in the fighting, with another 40 damaged or broken down. The fighting was later termed the "Hammering of the Panzers". In the late afternoon and early evening, the 133rd Lorried and 151st Infantry Brigades—by this time back under command of 51st Infantry Division—attacked respectively the Snipe and Skinflint (about a mile west of Snipe) positions in order to form a base for future operations. The heavy artillery concentration which accompanied their advance suppressed the opposition from the Trieste Division and the operation succeeded with few casualties.[107]
On the night of 2 November, Montgomery once again reshuffled his infantry in order to bring four brigades (5th Indian, 151st, 5th New Zealand and 154th) into reserve under XXX Corps to prepare for the next thrust. He also reinforced X Corps by moving 7th Armoured Division from army reserve and sending 4th Light Armoured Brigade from XIII Corps in the south. General von Thoma's report to Rommel that night said he would have at most 35 tanks available to fight the next day and his artillery and anti-tank weapons had been reduced to ⅓ of their strength at the start of the battle. Rommel concluded that to forestall a breakthrough and the resulting destruction of his whole army he must start withdrawing to the planned position at Fuka. He called up Ariete from the south to join the mobile Italian XX Corps around Tel el Aqqaqir. His mobile forces (XX Corps, Afrika Korps, 90th Light Division and 19th Flak Division) were ordered to make a fighting withdrawal while his other formations were to withdraw as best they could with the limited transport available.[108]
D + 11: 3 November edit
At 20:30 on 2 November, Lumsden decided that one more effort by X Corps would see the gun screen on the Rahman track defeated and ordered the 7th Motor Brigade to seize the track along a 2 mi (3.2 km) front north of Tel el Aqqaqir. The 2nd and 8th Armoured Brigades would then pass through the infantry to a distance of about 3.5 mi (5.6 km). On the morning of 3 November the 7th Armoured Division would pass through and swing north heading for the railway at Ghazal station. 7th Motor Brigade set off at 01:15 on 3 November, but having received its orders late, had not had the chance to reconnoitre the battle area in daylight. This combined with stiff resistance led to the failure of their attack. As a consequence, the orders for the armour were changed and 2nd Armoured Brigade was tasked to support the forward battalion of the 133rd Lorried Brigade (2nd King's Royal Rifle Corps) and the 8th Armoured Brigade was to push south-west. Fighting continued throughout 3 November, but the 2nd Armoured Brigade was held off by elements of the Afrika Korps and tanks of the Littorio Division. Further south, the 8th Armoured Brigade was held off by anti-tank units helped later by tanks of the arriving Ariete Division.[109]
Phase five: the break-out edit

On 2 November, Rommel signalled to Hitler that
The army's strength was so exhausted after its ten days of battle that it was not now capable of offering any effective opposition to the enemy's next break-through attempt ... With our great shortage of vehicles an orderly withdrawal of the non-motorised forces appeared impossible ... In these circumstances we had to reckon, at the least, with the gradual destruction of the army.[110]
and at 13.30 on 3 November Rommel received a reply,
To Field Marshal Rommel. It is with trusting confidence in your leadership and the courage of the German-Italian troops under your command that the German people and I are following the heroic struggle in Egypt. In the situation which you find yourself there can be no other thought but to stand fast, yield not a yard of ground and throw every gun and every man into the battle. Considerable air force reinforcements are being sent to C.-in-C South. The Duce and the Comando Supremo are also making the utmost efforts to send you the means to continue the fight. Your enemy, despite his superiority, must also be at the end of his strength. It would not be the first time in history that a strong will has triumphed over the bigger battalions. As to your troops, you can show them no other road than that to victory or death. Adolf Hitler.[111]
Rommel thought the order (similar to one that had been given at the same time by Benito Mussolini through Comando Supremo),
demanded the impossible. ... We were completely stunned, and for the first time in the African campaign I did not know what to do. A kind of apathy took hold of us as we issued orders for all existing positions to be held on instructions from the highest authority.[111]
Rommel ordered the Italian X and XXI Corps and the 90th Light Division to hold while the Afrika Korps withdrew approximately 6 mi (9.7 km) west during the night of 3 November. The Italian XX Corps and the Ariete Division conformed to their position and Rommel replied to Hitler confirming his determination to hold the battlefield. The Desert Air Force continued its bombing and in its biggest day of the battle it flew 1,208 sorties and dropped 396 long tons (402 t) of bombs.[112]
On the night of 3/4 November, Montgomery ordered three of the infantry brigades in reserve to advance on the Rahman track as a prelude to an armoured break-out. At 17:45, the 152nd Infantry Brigade with the 8th RTR in support, attacked about 2 mi (3.2 km) south of Tel el Aqqaqir. The 5th Indian Infantry Brigade was to attack the track 4 mi (6.4 km) further south during the early hours of 4 November; at 06:15, the 154th Infantry Brigade was to attack Tel el Aqqaqir. The 152nd Infantry Brigade was mistakenly told the Axis had withdrawn from their objectives and unexpectedly met determined resistance. Communications failed and the forward infantry elements ended up digging in well short of their objective. By the time the 5th Indian Brigade set off, the defenders had begun to withdraw and their objective was taken virtually unopposed. By the time the 154th Brigade moved into some artillery-fire, the Axis had left.[113]
D + 12, 4 November edit

On 4 November, the Eighth Army plan for pursuit began at dawn; no fresh units were available and the 1st and 7th Armoured divisions were to turn northwards to roll up the Axis units still in the forward lines. The 2nd New Zealand Division with two lorried infantry brigades and the 9th Armoured and 4th Light Armoured brigades under command, was to head west along desert tracks to the escarpment above Fuka, about 60 mi (97 km) away. The New Zealanders got off to a slow start because its units were dispersed after the recent fighting and took time to concentrate. Paths through the minefields were congested and had deteriorated, which caused more delays. By dark, the division was only 15 mi (24 km) west of the Rahman track, the 9th Armoured Brigade was still at the track and the 6th New Zealand Brigade even further back.[114]
The plan to trap the 90th Light Division with the 1st and 7th Armoured divisions misfired. The 1st Armoured Division came into contact with the remnants of 21st Panzer Division and had to spend most of the day pushing them back 8 mi (13 km). The 7th Armoured Division was held up by the Ariete Armoured Division, which was destroyed conducting a determined resistance.[115] In his diary, Rommel wrote
Enormous dust-clouds could be seen south and south-east of headquarters [of the DAK], where the desperate struggle of the small and inefficient Italian tanks of XX Corps was being played out against the hundred or so British heavy tanks which had come round their open right flank. I was later told by Major von Luck, whose battalion I had sent to close the gap between the Italians and the Afrika Korps, that the Italians, who at that time represented our strongest motorised force, fought with exemplary courage. Tank after tank split asunder or burned out, while all the time a tremendous British barrage lay over the Italian infantry and artillery positions. The last signal came from the Ariete at about 15.30 hours "Enemy tanks penetrated south of Ariete. Ariete now encircled. Location 5 km north-west Bir el Abd. Ariete tanks still in action". [...] In the Ariete we lost our oldest Italian comrades, from whom we had probably always demanded more than they, with their poor armament, had been capable of performing.[116][l]
The 133rd Armoured Division "Littorio" and the 101st Motorised Division "Trieste" were also destroyed. Berlin radio claimed that in this sector the "British were made to pay for their penetration with enormous losses in men and material. The Italians fought to the last man."[118] The British took many prisoners, since the remnants of Italian infantry divisions were not motorised and could not escape from encirclement. Private Sid Martindale, 1st Battalion Argyll & Sutherland Highlanders, wrote about the 25th Infantry Division "Bologna", which had taken the full weight of the British armoured attack.[m]
The more we advanced the more we realised that the Italians did not have much fight in them after putting up a strong resistance to our overwhelming advance and they started surrendering to our lead troops in droves. There was not much action to see but we came across lots of burnt out Italian tanks that had been destroyed by our tanks. I had never seen a battlefield before and the site [sic] of so many dead was sickening.[120]
The Bologna Division and the remnants of the Trento Division tried to fight their way out and marched into the desert without water, food or transport before surrendering, exhausted and dying from dehydration.[121] It was reported that Colonel Arrigo Dall'Olio, commanding the 40th Infantry Regiment of the Bologna Division, surrendered saying, "We have ceased firing not because we haven't the desire but because we have spent every round".[122] In a symbolic act of defiance, no one in the 40th Infantry Regiment "Bologna" raised their hands. Harry Zinder of Time magazine noted that the Italians fought better than had been expected and commented that for the Italians
It was a terrific letdown by their German allies. They had fought a good fight. In the south, the famed Folgore division fought to the last round of ammunition. Two armoured divisions and a motorised division, which had been interspersed among the German formations, thought they would be allowed to retire gracefully with Rommel's 21st, 15th and 19th [sic] light. But even that was denied them. When it became obvious to Rommel that there would be little chance to hold anything between El Daba and the frontier, his Panzers dissolved, disintegrated and turned tail, leaving the Italians to fight a rear-guard action.[123]
By late morning on 4 November, Rommel realised his situation was desperate,
The picture in the early afternoon of the 4th was as follows: powerful enemy armoured forces ... had burst a 19-kilometre hole in our front, through which strong bodies of tanks were moving to the west. As a result of this, our forces in the north were threatened with encirclement by enemy formations 20 times their number in tanks ... There were no reserves, as every available man and gun had been put into the line. So now it had come, the thing we had done everything in our power to avoid – our front broken and the fully motorised enemy streaming into our rear. Superior orders could no longer count. We had to save what there was to be saved.[116]
Rommel telegraphed Hitler for permission to fall back on Fuka. As further British blows fell, Thoma was captured and reports came in from the Ariete and Trento divisions that they were encircled. At 17:30, unable to wait any longer for a reply from Hitler, Rommel gave orders to retreat.[115]
Due to lack of transport, most of the Italian infantry formations were abandoned.[124][125] Any chance of getting them away with an earlier move had been spoiled by Hitler's insistence that Rommel hold his ground, obliging him to keep the non-motorised Italian units well forward until it was too late.[126] To deepen the armoured thrusts, the 1st Armoured Division was directed at El Daba, 15 mi (24 km) down the coast and the 7th Armoured Division towards Galal, a further 24 km (15 mi) west along the railway. The New Zealand Division group had hoped to reach their objective by mid-morning on 5 November but was held up by artillery-fire when picking their way through what turned out to be a dummy minefield and the 15th Panzer Division got there first.[127]
D + 13, 5 November edit

The 7th Armoured Division was ordered cross-country to cut the coast road at Sidi Haneish, 65 mi (105 km) west of the Rahman track, while the 1st Armoured Division, west of El Dada, was ordered to take a wide detour through the desert to Bir Khalda, 80 mi (130 km) west of the Rahman track, preparatory to turning north to cut the road at Mersa Matruh. Both moves failed, the 7th Armoured Division finished the day 20 mi (32 km) short of its objective. The 1st Armoured Division tried to make up time with a night march but in the darkness the armour became separated from their support vehicles and ran out of fuel at dawn on 6 November, 16 mi (26 km) short of Bir Khalda. The DAF continued to fly in support but because of the dispersion of X Corps, it was difficult to establish bomb lines, beyond which, aircraft were free to attack.[128]
D + 14, 6 November edit
By 11:00 on 6 November, the "B" Echelon support vehicles began to reach the 1st Armoured Division but with only enough fuel to replenish two of the armoured regiments, which set off again hoping to be in time to cut off the Axis. The regiments ran out of fuel again, 30 mi (48 km) south-west of Mersa Matruh. A fuel convoy had set out from Alamein on the evening of 5 November but progress was slow as the tracks had become very cut up. By midday on 6 November, it began to rain and the convoy bogged 40 mi (64 km) from the rendezvous with the 1st Armoured Division "B".[129] The 2nd New Zealand Division advanced toward Sidi Haneish while the 8th Armoured Brigade, 10th Armoured Division, had moved west from Galal to occupy the landing fields at Fuka and the escarpment. Roughly 15 mi (24 km) south-west of Sidi Haneish, the 7th Armoured Division encountered the 21st Panzer Division and the Voss Reconnaissance Group that morning. In a running fight, the 21st Panzer Division lost 16 tanks and numerous guns, narrowly escaping encirclement and reached Mersa Matruh that evening. It was again difficult to define bomb lines but US heavy bombers attacked Tobruk, sinking Etiopia [2,153 long tons (2,188 t)] and later attacked Benghazi, sinking Mars and setting the tanker Portofino (6,572 GRT), alight.[130]
D + 15 onward, 7 to 11 November edit

On 7 November, waterlogged ground and lack of fuel stranded the 1st and 7th Armoured divisions. The 10th Armoured Division, on the coast road and with ample fuel, advanced to Mersa Matruh while its infantry mopped up on the road west of Galal.[131] Rommel intended to fight a delaying action at Sidi Barrani, 80 mi (130 km) west of Matruh, to gain time for Axis troops to get through the bottlenecks at Halfaya and Sollum.[132] The last rearguards left Matruh on the night of 7/8 November but were only able to hold Sidi Barrani until the evening of 9 November. By the evening of 10 November, the 2nd New Zealand Division, heading for Sollum, had the 4th Light Armoured Brigade at the foot of the Halfaya Pass while 7th Armoured Division was conducting another detour to the south, to take Fort Capuzzo and Sidi Azeiz. On the morning of 11 November, the 5th New Zealand Infantry Brigade captured the pass, taking 600 Italian prisoners. By nightfall on 11 November, the Egyptian wall was clear but Montgomery was forced to order that the pursuit should temporarily be continued only by armoured cars and artillery, because of the difficulty in supplying larger formations west of Bardia.[133]
Aftermath edit
Analysis edit
Despite his defeat at El Alamein, Rommel did not lose hope until the end of the Tunisia Campaign.[citation needed] Alexander contacted Churchill and suggested he "Ring out the bells".[134]
Churchill was due to address the Lord Mayor's Banquet at the Mansion House on 10 November 1942. He spoke at length about the victory and made his famous claim that
This is not the end. It is not even the beginning of the end. But it is perhaps the end of the beginning.[134][135]
Looking back in 1950, Churchill wrote in his memoirs that: "It may almost be said, 'Before Alamein we never had a victory. After Alamein we never had a defeat'".[136]
The Allies frequently had numerical superiority in the Western Desert but never had it been so complete in quantity and quality. With the arrival of Sherman tanks, 6-pounder anti-tank guns and Spitfires in the Western Desert, the Allies gained a comprehensive superiority.[137] Montgomery envisioned the battle as an attrition operation, similar to those fought in the First World War and accurately predicted the length of the battle and the number of British and Commonwealth casualties. British artillery was superbly handled and British air support was excellent, in contrast to the Luftwaffe and Regia Aeronautica, which offered little or no support to ground forces, preferring to engage in air-to-air combat. Air supremacy had a huge effect on the battle. Montgomery wrote,
The moral effect of air action [on the enemy] is very great and out of all proportion to the material damage inflicted. In the reverse direction, the sight and sound of our own air forces operating against the enemy have an equally satisfactory effect on our own troops. A combination of the two has a profound influence on the most important single factor in war—morale.[91]
Historians debate the reasons Rommel decided to advance into Egypt. In 1997, Martin van Creveld wrote that Rommel had been advised by the German and Italian staffs that his army could not properly be supplied so far from the ports of Tripoli and Benghazi. Rommel pressed ahead with his advance to Alamein and as predicted, supply difficulties limited the attacking potential of the Axis forces.[32] According to Maurice Remy (2002), Hitler and Mussolini put pressure on Rommel to advance, the importance to them being the need to capture the Suez Canal and seize the Middle East and Persian oil fields. Rommel had been very pessimistic, especially after the First Battle of El Alamein and knew that as US supplies were en route to Africa and Axis ships were being sunk in the Mediterranean, the Axis was losing a race against time. On 27 August, Kesselring promised Rommel that supplies would arrive in time but Siegfried Westphal pointed out that such an expectation would be unrealistic and the offensive should not begin until they had arrived. After a conversation with Kesselring on 30 August, Rommel decided to attack, "the hardest [decision] in my life".[33]
Casualties edit

In 2005, Niall Barr wrote that the 36,939 Panzerarmee casualties, was an estimate because of the chaos of the Axis retreat. British figures, based on Ultra intercepts, gave German casualties as 1,149 killed, 3,886 wounded and 8,050 men captured. Italian losses were 971 dead, 933 wounded and 15,552 men captured. By 11 November, the number of Axis prisoners had risen to 30,000 men.[138] In a note to The Rommel Papers, Fritz Bayerlein (quoting figures obtained from Offizieller Bericht des Oberkommandos Afrika) instead estimated German losses in the battle as 1,100 killed, 3,900 wounded and 7,900 prisoners and Italian losses as 1,200 killed, 1,600 wounded and 20,000 prisoners.[139]
According to the Italian official history, Axis losses during the battle were 4,000 to 5,000 killed or missing, 7,000 to 8,000 wounded and 17,000 prisoners; during the retreat the losses rose to 9,000 killed or missing, 15,000 wounded and 35,000 prisoners.[140] According to General Giuseppe Rizzo, total Axis casualties included 25,000 men killed or wounded (including 5,920 Italians killed) and 30,000 prisoners (20,000 Italians and 10,724 Germans), 510 tanks and 2,000 field guns, anti-tank guns, anti-aircraft guns.[141] Axis tank losses were c. 500; on 4 November, only 36 German tanks were left out of the 249 at the beginning of the battle. About half of the 278 Italian tanks had been lost and most of the remainder were knocked out on the next day by the 7th Armoured Division. About 254 Axis guns were lost, along with 64 German and 20 Italian aircraft.[138][142]
The Eighth Army had 13,560 casualties, of whom 2,350 men had been killed, 8,950 wounded and 2,260 were missing; 58 per cent of the casualties were British, 22 per cent Australian, 10 per cent New Zealanders, 6 per cent South African, 1 per cent Indian and 3 per cent other nationalities. The Eighth Army lost from 332 to 500 tanks, although by the end of the battle, 300 had been repaired. The artillery lost 111 guns and the DAF lost 77 British and 20 American aircraft.[14]
Subsequent operations edit
The Eighth Army was surprised by the Axis withdrawal and confusion caused by redeployments between the three corps meant they were slow in pursuit, failing to cut off Rommel at Fuka and Mersa Matruh.[143] The Desert Air Force failed to make a maximum effort to bomb a disorganised and retreating opponent, which on 5 November was within range and confined to the coast road. Supply shortages and a belief that the Luftwaffe were about to get strong reinforcements, led the DAF to be cautious, reduce the number of offensive sorties on 5 November and protect the Eighth Army.[144]
Battle of El Agheila edit

The Axis made a fighting withdrawal to El Agheila but the Axis troops were exhausted and had received few replacements, while Montgomery had planned to transport material over great distances, to provide the Eighth Army with 2,400 t (2,646 short tons) of supplies per day. Huge quantities of engineer stores had been collected to repair the coast road; the railway line from El Alamein to Fort Capuzzo, despite having been blown up in over 200 places, was quickly repaired. In the month after the Eighth Army reached Capuzzo, the railway carried 133,000 short tons (120,656 t) of supplies. Benghazi handled 3,000 short tons (2,722 t) a day by the end of December, rather than the expected 800 short tons (726 t).[145]
Montgomery paused for three weeks to concentrate his forces and prepare an assault on El Agheila to deny the Axis the possibility of a counter-attack. On 11 December, the 51st (Highland) Division attacked along the line of the coast road with the 7th Armoured Division on the inland flank. On 12 December the 2nd New Zealand Division started a deeper flanking manoeuvre to cut the Axis line of retreat on the coast road in the rear of the Mersa Brega position.[146] The Highland Division made a slow and costly advance and 7th Armoured Division met stiff resistance from the Combat Group "Ariete" (the remains of the 132nd Armoured Division "Ariete"). The Panzerarmee had lost roughly 75,000 men, 1,000 guns and 500 tanks since the Second Battle of Alamein and withdrew.[147] By 15 December, the New Zealanders had reached the coast road but the firm terrain allowed Rommel to break his forces into smaller units and withdraw cross-country through the gaps between the New Zealand positions.[148]
Rommel conducted a text-book retreat, destroying all equipment and infrastructure left behind and peppering the land behind him with mines and booby traps.[149] The Eighth Army reached Sirte on 25 December but west of the port, were forced to pause to consolidate their strung out formations and to prepare an attack at Wadi Zemzem, near Buerat 230 mi (370 km) east of Tripoli.[150] Rommel had, with the agreement of Field Marshal Bastico, sent a request to the Italian Comando Supremo in Rome to withdraw to Tunisia where the terrain would better suit a defensive action and where he could link with the Axis army forming there after the Operation Torch landings. Mussolini replied on 19 December that the Panzerarmee must resist to the last man at Buerat.[148]
Tripoli edit
On 15 January 1943, the 51st (Highland) Division made a frontal attack while the 2nd New Zealand Division and the 7th Armoured Division drove around the inland flank of the Axis line. Weakened by the withdrawal of 21st Panzer Division to Tunisia to strengthen the 5th Panzer Army (Hans-Jürgen von Arnim), Rommel conducted a fighting retreat.[151] The port of Tripoli, 150 mi (240 km) further west, was taken on 23 January as Rommel continued to withdraw to the Mareth Line, the French southern defensive position in Tunisia.
Tunisia edit
Rommel was by this time in contact with the Fifth Panzer Army, which had been fighting against the multi-national First Army in northern Tunisia, since shortly after Operation Torch. Hitler was determined to retain Tunisia and Rommel finally started to receive replacement men and materials. The Axis faced a war on two fronts, with the Eighth Army approaching from the east and the British, French and Americans from the west. The German-Italian Panzer Army was renamed the Italian First Army (General Giovanni Messe) and Rommel assumed command of the new Army Group Africa, responsible for both fronts.[citation needed] The two British armies were commanded by the 18th Army Group (General Harold Alexander). The failure of the Run for Tunis by the First Army in December 1942, led the North African campaign to last longer, ending when the Italian-German forces in North Africa capitulated in May 1943.
See also edit
- List of British military equipment of World War II
- List of Australian military equipment of World War II
- List of German military equipment of World War II
- List of Italian Army equipment in World War II
- Enham Alamein (Village in Hampshire, England named in honour of the battle)
- El Alamein Fountain (war memorial commemorating the battle, in Sydney, Australia)
- List of World War II battles
- North African campaign timeline
Notes edit
- ^ In Playfair the estimate for this figure is 104,000 comprising 54,000 Italians and 50,000 Germans including the 19th Flak Division and the Ramcke Parachute Brigade, both Luftwaffe units. There were approximately 77,000 Italians in North Africa who did not come under the Panzerarmee.[5]
- ^ 249 German tanks and 298 Italian tanks: 31 Panzer II, 85 Panzer III (short 50mm main gun), 88 Panzer III (long 50mm main gun), 8 Panzer IV (short 75mm main gun), 30 Panzer IV (long 75mm main gun), 7 command tanks, 278 Fiat M13/40 variants and 20 Italian light tanks; another 23 German tanks under repair, have been excluded.[6]
- ^ 275 German (150 serviceable) including 80 dive bombers) and 400 Italian (200 serviceable) aircraft. There was a further 225 (130 serviceable) German bombers in Italy and Greece. There were 300 German and Italian transport aircraft not included in the total.[8]
- ^ 68 7.65 cm (Source possibly means the 7.62 cm PaK 36(r)) anti-tank guns, 290 50mm Pak 38 anti-tank guns, 88mm flak guns.[10]
- ^ 1,029 tanks were operational at the start of the battle: 170 M3 Grant and 252 M4 Sherman medium tanks, 216 Crusader II and 78 Crusader III Cruiser tanks, 119 M3 Stuart (Honey) light tanks and 194 Valentine Infantry tanks. There were 200 replacement tanks and over 1,000 tanks were in various stages of repair, overhaul or being modified at workshops.[12]
- ^ There was a front line strength of 420 fighters, of which only 50 were Supermarine Spitfire and nearly half were Hawker Hurricanes.[7]
- ^ This figure excludes 54 transport aircraft.[8]
- ^ 554 were 2 pounder anti-tank guns and 849 6 pounders.[10]
- ^ including 4,810 killed or missing and 8,950 wounded.[14]
- ^ The Polish Mine Detector designed in Scotland in 1941 by the Polish engineer and signals officer, Lieutenant Józef Kosacki was to be used for the first time in action. Five hundred of these were issued to Eighth Army. The apparatus doubled the speed at which heavily mined sands could be cleared, from around 100 m (110 yd) to about 200 m (220 yd) an hour.[28]
- ^ At midnight on 2 November, the air bombardment suggested a new offensive was about to start and the headquarters of Panzer Army Africa gave orders that all the positions were to be held no matter what. A battalion of 90th Light Division in the north, along with another one of 15th Panzer Division in the south, were soon overrun and at 4:45 a.m. it was reported that only one Bersaglieri infantry battalion was still holding the line ... A little while later, the tanks of the 9th Armoured Brigade arrived, immediately attacking the Axis positions along the Rahman track ... with its three battalions deployed from north to south, 3rd Hussars, Royal Wiltshire Yeomanry and Warwickshire Yeomanry, supported by the anti-tank guns of the 14th Sherwood Foresters.[97]
- ^ Ariete was not completely destroyed and fought in the following battle of El Agheila.[117]
- ^ This is not accurate. The Bologna was returning on foot to the front line after the retreat order by Rommel had been cancelled. When the attack by 2nd New Zealand Division achieved a breakthrough in the sector defended by the Trento Division, armoured cars and tanks were sent forward in the open desert and caught the exhausted and disorganised soldiers of the Bologna Division off guard.[119]
Footnotes edit
- ^ ياغي, إسماعيل أحمد; شاكر, محمود (October 2008). "تاريخ العالم الإسلامي الحديث والمعاصر : قارة إفريقية : الجزء الثاني:–1492-1980".
- ^ Maurer 1983, p. 120.
- ^ Latimer 2003, pp. 249–250.
- ^ Buffetaut 1995, p. 95.
- ^ a b c d e f Playfair 2004, p. 30.
- ^ Playfair 2004, pp. 9–11.
- ^ a b Barr 2005, p. 304.
- ^ a b Playfair 2004, p. 3.
- ^ a b Barr 2005, p. 26.
- ^ a b Playfair 2004, p. 10.
- ^ Barr 2005, p. 276.
- ^ Playfair 2004, p. 9.
- ^ a b Clodfelter 2017, p. 455.
- ^ a b Playfair 2004, pp. 404, 78.
- ^ Terraine 1985, p. 385.
- ^ Lucas-Phillips 1965.
- ^ Mussolini's War: Fascist Italy from Triumph to Collapse 1935-1943, John Gooch.
- ^ The change of commands in the Axis forces occurred in August 1942. General Ugo Cavallero was temporarily made overall Axis commander in Egypt as Bastico's command were only limited in Libya. However, the Italian High Command made General Curio Barbasetti di Prun as the Italian commander of the Italian Army Africa (All Italian Corps under its control) but General Prun's command was only administrative to these units. Cavallero gave Rommel the full tactical control of German and Italian forces in Egypt.
- ^ a b Bierman & Smith 2003, p. 255.
- ^ "Intercepted Communications for Field Marshal Erwin Rommel". HISTORYNET. 12 June 2006. Retrieved 5 June 2021.
- ^ Hinsley 1981, p. 425.
- ^ Hinsley 1981, p. 423.
- ^ a b c Hinsley 1981, p. 427.
- ^ Greene & Massignani 1994, p. 219.
- ^ a b c d Playfair 2004, p. 34.
- ^ a b Dear 2005, p. 254.
- ^ Hinsley 1981, pp. 430–431.
- ^ Modelski 1986, p. 221.
- ^ Lucas 1983, p. 123.
- ^ Barr 2005, p. 269.
- ^ Afrika Korps War Diary, 30 September 1942
- ^ a b Creveld 1997, p. 196.
- ^ a b Remy 2002, pp. 111–116.
- ^ Playfair 2004, p. 26.
- ^ Hinsley 1981, pp. 432–433.
- ^ Playfair 2004, pp. 27–28.
- ^ Jentz 1996, p. 8.
- ^ Playfair 2004, pp. 28–29.
- ^ Watson 2007, p. 20.
- ^ Hinsley 1981, p. 431.
- ^ Latimer 2002, p. 177.
- ^ Mead 2007, p. 304.
- ^ Barr 2005, p. 308.
- ^ Clifford 1943, p. 307.
- ^ a b Hinsley 1981, p. 438.
- ^ a b Dickens 2017.
- ^ Bierman & Smith 2003, chapters 22–24.
- ^ Bauer 2000, pp. 366–368.
- ^ Bauer 2000, p. 368.
- ^ Playfair 2004, p. 42.
- ^ a b Playfair 2004, p. 44.
- ^ Stroud 2013, pp. 211–212.
- ^ a b Playfair 2004, p. 50.
- ^ Robert Citino, Death of the Wehrmacht: The German Campaigns of 1942, University Press of Kansas, 2007, p. 283.
- ^ Green, Major Dennis C. (1984). Historical Battle Analysis, El Alamein and the Principles of War (PDF). p. 20. Archived (PDF) from the original on 23 October 2021.
- ^ Young 1966, p. 260.
- ^ a b Playfair 2004, p. 46.
- ^ Playfair 2004, p. 47.
- ^ Playfair 2004, p. 48.
- ^ Clifford 1943, p. 308.
- ^ a b Playfair 2004, p. 49.
- ^ Greene & Massignani 1994, p. 177.
- ^ Montanari 1993, pp. 753–754.
- ^ a b Young 1966, p. 261.
- ^ Watson 2007, p. 23.
- ^ Playfair 2004, pp. 50–51.
- ^ Strawson 1981, p. 119.
- ^ Barr 2005, p. 360.
- ^ Hinsley 1981, p. 439.
- ^ Playfair 2004, p. 51.
- ^ Vivian 2000, p. 278.
- ^ Playfair 2004, p. 52.
- ^ Playfair 2004, pp. 53–54.
- ^ Playfair 2004, p. 54.
- ^ Playfair 2004, pp. 54–55.
- ^ Playfair 2004, p. 56.
- ^ Lucas-Phillips 1962, p. 296.
- ^ Playfair 2004, pp. 56–57.
- ^ Playfair 2004, pp. 56, 54.
- ^ Lucas-Phillips 1962, p. 285.
- ^ Playfair 2004, p. 57.
- ^ a b Hinsley 1981, p. 441.
- ^ Walker 2006, p. 166.
- ^ a b Playfair 2004, p. 58.
- ^ Johnston, Dr. Mark (23 October 2002). "The Battle of El Alamein, 23 October 1942". Remembering 1942. Australian War Memorial, Canberra. Archived from the original on 9 July 2007. Retrieved 15 April 2008.
- ^ Playfair 2004, pp. 58, 63.
- ^ Vivian 2000, p. 279.
- ^ Playfair 2004, p. 59.
- ^ Playfair 2004, pp. 61–62.
- ^ Barr 2005, p. 380.
- ^ a b Playfair 2004, p. 63.
- ^ Watson 2007, p. 26.
- ^ Playfair 2004, Map 10.
- ^ a b Playfair 2004, pp. 64–65.
- ^ Hinsley 1981, p. 445.
- ^ Zapotoczny, Walter S. Jr. (17 August 2018). The Italian Army In North Africa: A Poor Fighting Force or Doomed by Circumstance. Fonthill Media.
- ^ Battistelli 2011, p. 147.
- ^ Playfair 2004, p. 66.
- ^ Barr 2005, p. 387.
- ^ Playfair 2004, pp. 66–67.
- ^ a b c d Barr 2005, p. 386.
- ^ Walker 1967, p. 395.
- ^ a b Playfair 2004, p. 67.
- ^ a b Watson 2007, p. 24.
- ^ Barr 2005, pp. 388–389.
- ^ Lucas-Phillips 1962, p. 358.
- ^ Playfair 2004, pp. 67–70.
- ^ Playfair 2004, pp. 68–69.
- ^ Playfair 2004, pp. 70–71.
- ^ Rommel 1982, p. 319.
- ^ a b Rommel 1982, p. 321.
- ^ Playfair 2004, pp. 73–74.
- ^ Playfair 2004, p. 75.
- ^ Playfair 2004, pp. 81, 83.
- ^ a b Playfair 2004, p. 84.
- ^ a b Rommel 1982, p. 325.
- ^ Montanari 1993, p. 815.
- ^ "Desert War, Note (11): Statement issued by the German Government on 6 November 1942". spartacus-educational.com. Archived from the original on 9 April 2009. Retrieved 26 February 2019.
- ^ Montanari 1993, p. 812.
- ^ Spirit, Martin; Martindale, Sid (2005). "Sid's War: The Story of an Argyll at War". Archived from the original on 22 June 2011. Retrieved 27 January 2008.
- ^ Watson 2007, p. 27.
- ^ Sillavengo 1966, p. 130.
- ^ Zinder, Harry (16 November 1942). "A Pint of Water per Man". Time Magazine (16 November 1942). Archived from the original on 26 September 2010. Retrieved 23 May 2010.
- ^ Bierman & Smith 2003, chapter 27.
- ^ Bauer 2000, p. 372.
- ^ Playfair 2004, p. 73.
- ^ Playfair 2004, pp. 86–87.
- ^ Playfair 2004, pp. 87–88.
- ^ Playfair 2004, pp. 89–90.
- ^ Playfair 2004, p. 90.
- ^ Playfair 2004, p. 91.
- ^ Playfair 2004, p. 93.
- ^ Playfair 2004, pp. 94–95.
- ^ a b "Autumn 1942". International Churchill Society. 12 March 2015. Retrieved 21 August 2023.
- ^ "Winston Churchill's Speech at the Mansion House, 10 November 1942". Imperial War Museum. Retrieved 21 August 2023.
- ^ Churchill 1950, p. 603.
- ^ Playfair 2004, p. 76.
- ^ a b Barr 2005, p. 404.
- ^ "The Rommel Papers". 1953.
- ^ Montanari 1993, p. 838.
- ^ Giuseppe Rizzo, Buche e croci nel deserto, Verona, 1969, p. 549.
- ^ Playfair 2004, pp. 78–79.
- ^ Watson 2007, p. 30.
- ^ Hinsley 1981, pp. 452–453.
- ^ Clifford 1943, pp. 317–318.
- ^ Watson 2007, pp. 39, 42.
- ^ Clifford 1943, p. 319.
- ^ a b Watson 2007, p. 43.
- ^ Clifford 1943, pp. 322, 320.
- ^ Clifford 1943, pp. 325–327.
- ^ Watson 2007, p. 44.
References edit
- Barr, Niall (2005) [2004]. Pendulum of War: The Three Battles of El Alamein. Woodstock, NY: Overlook Press. ISBN 978-1-58567-738-2.
- Battistelli, Pier Paolo (2011). Battle Story: El Alamein 1942. The History Press. ISBN 978-0-7524-6848-8.
- Bauer, Eddy (2000) [1979]. Young, Peter (ed.). The History of World War II (2nd rev. ed.). London: Orbis. ISBN 1-85605-552-3.
- Bierman, John; Smith, Colin (2003) [2002]. War Without Hate: The Desert Campaign of 1940–1943. New York: Penguin Books. ISBN 978-0-14-200394-7.
- Buffetaut, Yves (1995). Operation Supercharge-La seconde bataille d'El Alamein [Operation Supercharge: Second Battle of El Alamein]. Les grandes batailles de la Seconde Guerre mondiale: Collection hors-série Militaria (in French). Paris: Histoire Et Collections. OCLC 464158829.
- Churchill, W. (1950). The Hinge of Fate. The Second World War. New York: Bantam. OCLC 24115733.
- Clifford, Alexander (1943). Three Against Rommel. London: George G. Harrap. OCLC 10426023.
- Clodfelter, Micheal (2017). Warfare and Armed Conflicts: A Statistical Encyclopedia of Casualty and Other Figures, 1492–2015, 4th ed. McFarland. ISBN 978-0786474707.
- Creveld, Martin van (1997). Supplying War; Logistics from Wallenstein to Patton. Cambridge: Cambridge University Press. ISBN 0-521-54657-5.
- Dear, I. C. B., ed. (2005) [1995]. The Oxford Companion to World War II. Oxford University Press. ISBN 978-0-19-280666-6.
- Dickens, Peter (2017). "'General Pienaar, Tell Your South African Division, They Have Done Well'". samilhistory.com.
- Greene, Jack; Massignani, Alessandro (1994). Rommel's North Africa Campaign: September 1940 – November 1942. Cambridge, MA: Da Capo. ISBN 978-1-58097-018-1.
- Hinsley, F. H.; Thomas, E. E.; Ransom, C. F. G.; Knight, R. C. (1981). British Intelligence in the Second World War: Its influence on Strategy and Operations. Vol. II. London: HMSO. ISBN 0-11-630934-2.
- Jentz, Thomas L. (1996). Panzertruppen 2: The Complete Guide to the Creation & Combat Employment of Germany's Tank Force 1943–1945. Schiffer. ISBN 0-7643-0080-6.
- Latimer, Jon (2002). Alamein. London: John Murray. ISBN 978-0-7195-6203-7.
- Latimer, Jon (2003) [2002]. Alamein. London: John Murray. ISBN 978-0-7195-6213-6.
- Lucas-Phillips, C. E. (1962). Alamein. London: Heinemann. OCLC 3510044.
- Lucas-Phillips, C. E. (1965). Alamein. London: Pan Books. ISBN 978-0-330-30011-7.
- Lucas, James Sydney (1983). War in the Desert: The Eighth Army at El Alamein. New York: Beaufort Books. OCLC 610276818.
- Maurer, Maurer (1983) [1961]. Air Force Combat Units of World War II (PDF). Maxwell AFB, Alabama: Office of Air Force History. ISBN 0-89201-092-4.
- Mead, Richard (2007). Churchill's Lions: A Biographical Guide to the Key British Generals of World War II. Stroud: Spellmount. ISBN 978-1-86227-431-0.
- Modelski, Tadeusz (1986). The Polish Contribution to The Ultimate British Victory in The Second World War. Worthing. OCLC 60083169.
{{cite book}}: CS1 maint: location missing publisher (link) - Montanari, Mario (1993). El Alamein. Le operazioni in Africa Settentrionale. Vol. III. Roma: Stato Maggiore dell'esercito, Ufficio Storico. OCLC 313319483.
- Playfair, Major-General I. S. O.; et al. (2004) [1st. pub. HMSO 1966]. Butler, J. R. M. (ed.). The Mediterranean and Middle East: The Destruction of the Axis Forces in Africa. History of the Second World War United Kingdom Military Series. Vol. IV (Naval & Military Press ed.). London: HMSO. ISBN 1-84574-068-8.
- Remy, Maurice Philip [in German] (2002). Mythos Rommel (in German). Munich: List Verlag. ISBN 3-471-78572-8.
- Rommel, Erwin; Liddell Hart, Basil (1982) [1953]. The Rommel Papers. New York: Da Capo Press. ISBN 978-0-306-80157-0.
- Sillavengo, Paolo Caccia Dominioni de (1966). Alamein 1933–1962: An Italian Story. Translated by Chamberlin, Dennis. London: Allen & Unwin. OCLC 557831458.
- Stewart, A. (2016). The First Victory: The Second World War and the East Africa Campaign (1st ed.). New Haven, CT: Yale University Press. ISBN 978-0-300-20855-9.
- Strawson, John (1981). El Alamein: Desert Victory. London: J. M. Dent. OCLC 0460044222.
- Stroud, Rick (2013). The Phantom Army of Alamein: The Men Who Hoodwinked Rommel. Windsor, Bath: A&C Black. ISBN 978-1-4088-3128-1.
- Terraine, John (1985). The Right of the Line: The Royal Air Force in the European War, 1939–45. London: Hodder & Stoughton. ISBN 978-0-340-26644-1.
- Vivian, Cassandra (2000). The Western Desert of Egypt: An Explorer's Handbook. Cairo: American University in Cairo Press. ISBN 977-424-527-X.
- Walker, Ian W. (2006). Iron Hulls, Iron Hearts; Mussolini's Elite Armoured Divisions in North Africa. Ramsbury: The Crowood Press. ISBN 1-86126-646-4.
- Walker, Ronald (1967). Alam Halfa and Alamein. The Official History of New Zealand in the Second World War 1939–1945. Wellington, NZ: Historical Publications Branch. OCLC 893102.
- Watson, Bruce Allen (2007) [1999]. Exit Rommel: The Tunisian Campaign, 1942–43. Mechanicsburg, PA: Stackpole. ISBN 978-0-8117-3381-6.
- Young, Peter (1966). A Short History of World War II 1939–1945 (1970 ed.). London: Pan Books. OCLC 852185369.
Further reading edit
- Bright, John, ed. (1951). The Ninth Queen's Royal Lancers 1936–1945: The Story of an Armoured Regiment in Battle. Aldershot: Gale & Polden. OCLC 3732838.
- Carell, Paul (1962). The Foxes of the Desert. New York: Bantam Books. OCLC 721200796.
- Carver, Field Marshal Lord (2000) [1962]. El Alamein (pbk. ed.). Ware: Wordsworth Editions. ISBN 978-1-84022-220-3.
- Maughan, Barton (1966). "14 Launching the Battle and 15 The Dog Fight". Tobruk and El Alamein. Official History of Australia in the Second World War Series 1 (Army). Vol. III (online ed.). Canberra: Australian War Memorial. pp. 639–754. OCLC 954993. Retrieved 23 February 2018.
- Stumpf, R. (2001). "Part V: The War in the Mediterranean Area 1942–1943: Operations in North Africa and the Central Mediterranean". The Global War: Widening of the Conflict into a World War and the Shift of the Initiative 1941–1943. Germany and the Second World War. Vol. VI. Translated by Brownjohn, J. (Eng. trans. Clarendon Press, Oxford ed.). Potsdam: Militärgeschichtliches Forschungsamt (Research Institute for Military History). pp. 631–821. ISBN 0-19-822888-0.
External links edit
| External image | |
|---|---|
| The Second Battle of El Alamein | |
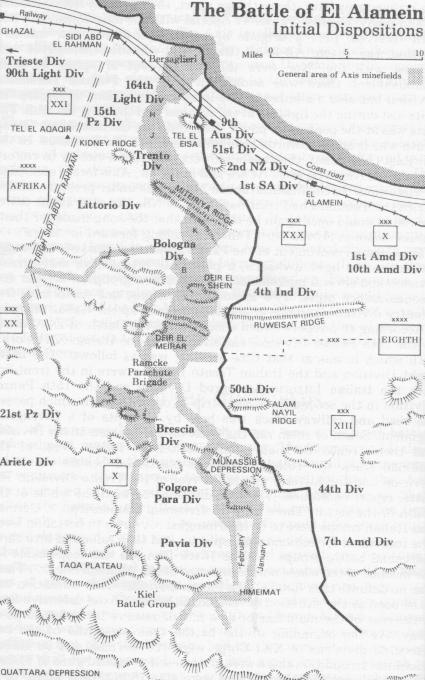
- The fate of the Italians in the battle as reported by TIME MAGAZINE
- The war time memories of Pte. Sid Martindale 1st Battalion Argyll & Sutherland Highlanders
- The 3rd Hussars (9th Armoured Brigade) at El Alamein
- Royal Engineers Museum Royal Engineers and Second World War (Deception and mine clearance at El Alamein)
- German Minefields at Alamein (October – November, 1942) US War Department Information Bulletin, 1943
- The History of the British 7th Armoured Division at the Wayback Machine (archived 21 June 2007)
- El Alamein at the Wayback Machine (archived 22 March 2008)
- El Alamein in Egypt Today (where to stay etc)[permanent dead link]