
- Go to the Google apis console
- If this is your first time, click "Create project...". Otherwise, click on the drop down under the "Google apis" logo at the top left, and click "Create..." under "Other projects".
- Click on "API Access", and then on "Create an OAuth 2.0 Client ID...".
- Enter a product name and click "Next".
- Select "Service Account" and click "Create client ID".
- Make note of the "Email address" shown under "Service account". It will be used later by the application configuration.
- Click "Download private key" and close the window. Save the private key in a secure place.
- Click "Services" in the left-side navigation, find the "Admin SDK" service in the list on the right, and click on its "Off" button until it becomes a green "On" button. Do the same with the "Groups Settings API" service.
- Unlike other services, these services need to have a special user permitted to use them. To create a special "Super Admin" user for this purpose:
- Go to the Google Admin site.
- Click on the icon for "Users".
- In the "Filters" column on the right of the page, expand the "Google Admins" section, then click on the "MCommunity Drivers" item.
- On the left side of the page, you need to choose a user to specify in the app. If none exists, you should create one with a "Super Admin" role. This user's email address will be used in the application configuration later.
- Manage OAuth key settings:
- Go to https://admin.google.com/SetupOAuth
- Check the box for "Enable this consumer key" in the "OAuth consumer key" section for the domain (e.g. "collab.its.umich.edu")
- Check the box for "Allow access to all APIs" in the "Two-legged OAuth access control" section.
- Click the "Save changes" button
- Manage API client access:
- Go to https://admin.google.com/ManageOauthClients
- In the "Client Name" field, enter the service account ID (not the email address)
- In the "One or More API Scopes" field, enter exactly this string: https://www.googleapis.com/auth/admin.directory.group,https://www.googleapis.com/auth/apps.groups.settings
- Click the "Authorize" button
- In the file_name_here.properties file, specify these values, from above:
- google.user=Super Admin user email address
- private.key.filename=filename of the downloaded private key
- account.id=Service Account email address
- application.name=an informative name which will appear in logs, like "mcomm-webapp/1.0"
Graph example edit
From: https://en.wikipedia.org/wiki/Photovoltaics#Economics
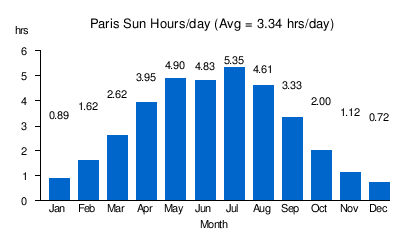 Source: Apricus[1] |
- ^ "Insolation Levels (Europe)". Apricus Solar. Archived from the original on 17 April 2012. Retrieved 14 April 2012.