Hiram Bledsoe's Missouri Battery was an artillery battery that served in the Missouri State Guard and the Confederate States Army during the American Civil War. The battery was formed when the Missouri State Guard was formed as a pro-secession state militia unit in response to the Camp Jackson affair. As part of the Missouri State Guard, the unit was engaged in the Engagement near Carthage and the Battle of Wilson's Creek during mid-1861, before fighting at the Battle of Dry Wood Creek and the Siege of Lexington later that year when Major General Sterling Price led the Guard northwards towards the Missouri River. After the Missouri State Guard retreated into Arkansas in early 1862, Bledsoe's Battery served during the Confederate defeat at the Battle of Pea Ridge in March. The battery, as part of the Army of the West, transferred across the Mississippi River into Tennessee in April, where it left the Guard to enter Confederate service on April 21.
| Hiram Bledsoe's Missouri Battery | |
|---|---|
| Active | June 16, 1861 to May 1, 1865 |
| Allegiance | |
| Branch | |
| Type | Artillery |
| Size | 53 (May 5, 1862) |
| Engagements | American Civil War |
The battery served in Mississippi during much of the rest of 1862, serving as part of the Confederate rear guard after the Battle of Iuka in September and seeing action at the Second Battle of Corinth. In early 1863, the unit became part of Brigadier General John Gregg's brigade, and was briefly stationed at Port Hudson, Louisiana. After Major General Ulysses S. Grant landed Union troops in Mississippi in April, Gregg's brigade transferred to Jackson, Mississippi to aid Confederate forces attempting to stop Grant. As part of Gregg's brigade, Bledsoe's Battery served at the Battles of Raymond and Jackson in May. In September, the battery was part of the Confederate Army of Tennessee when it repulsed Major General William Rosecrans' offensive into Georgia at the Battle of Chickamauga.
After Chickamauga, the battery next saw action at the Battle of Missionary Ridge in November, where it had its cannons captured during a Union charge. Beginning in May 1864, Bledsoe's Battery resisted Major General William T. Sherman's drive south during the Atlanta campaign, seeing action at the battles of Resaca and Kennesaw Mountain. After Atlanta fell to Union forces in September, the battery moved north with General John Bell Hood. Under Hood, the battery fought at the Battle of Nashville in December. Nashville was a Confederate defeat, and Bledsoe's Battery was part of Hood's rear guard after the fighting. While the rest of Hood's army transferred to North Carolina after Nashville, Bledsoe's Battery remained in Georgia, where it surrendered on May 1, 1865, ending the unit's combat career.
Background and formation edit
At the outset of the American Civil War in 1861, the state of Missouri did not secede, despite being a slave state. The state's governor, Claiborne Fox Jackson, supported secession, and mobilized the pro-secession state militia. In response, Brigadier General Nathaniel Lyon of the Union Army attacked the militia camp on May 10, which was outside of St. Louis, dispersing it in the Camp Jackson affair. On May 12, Jackson formed the Missouri State Guard as another pro-secession militia unit, and selected Major General Sterling Price to head the organization.[1] As part of the development of the Missouri State Guard, Hiram Bledsoe began recruiting an artillery battery for state service in May. The unit's first action was a small skirmish in Jackson County on June 13; it officially joined the Guard on June 16. Originally, the battery was assigned two cannons: a 6-pounder smoothbore and a 9-pounder smoothbore that was a relic of the Mexican-American War; the latter piece was given the name "Old Sacramento". After another artillery unit was consolidated with Bledsoe's Battery, the unit gained a third cannon, a second 6-pounder smoothbore. This piece was given the name "Black Bitch".[2]
Service history edit
1861 edit

The battery was one of the first Missouri State Guard units to occupy a key ridge at the Engagement near Carthage on July 5. As part of Richard Weightman's brigade, Bledsoe's Battery was positioned between two infantry regiments commanded by Colonel John R. Graves and Lieutenant Colonel William O'Kane; the battery's three cannons were manned by 46 men.[3] The fight began when Guibor's Missouri Battery fired at the Union line, drawing return fire. Bledsoe's Battery then joined in the artillery duel.[4] During the firefight, the men of the battery simply aimed at where the enemy was the thickest.[5] After ammunition began to run low, Bledsoe's and Guibor's batteries were forced to fire rocks, bits of scrap iron, and fragments of chains instead of actual projectiles.[6] Around 1:00 pm, Bledsoe's Battery moved forward to prepare for a Confederate attack; it was then exposed to heavy Union return fire.[7] As the Union force retreated later in the fight, the battery advanced across a ford to provide artillery support for the Confederate pursuit.[8] It followed the Confederate infantry as far as the vicinity of Carthage itself.[9] After the victory at Carthage, the Missouri State Guard was joined by a Confederate States Army force commanded by Brigadier General Ben McCulloch. The combined Missouri and Confederate force camped southeast of Springfield along the banks of Wilsons' Creek.[10]
On August 10, Lyon attacked the encampment.[11] As part of the Battle of Wilson's Creek, a Union column commanded by Colonel Franz Sigel attacked the Confederate position from the rear. Some of Sigel's skirmishers mistook McCulloch's Confederates as part of the main Union force, giving McCulloch time to prepare the 3rd Louisiana Infantry Regiment for battle. Separately, Bledsoe's Battery and two Missouri State Guard infantry regiments commanded by Lieutenant Colonel Thomas H. Rosser and O'Kane formed a line to McCulloch's right to counter the threat posed by Sigel.[12] Reid's Arkansas Battery arrived to support McCulloch, opening fire on Sigel's line, although the position of the 3rd Louisiana Infantry presented a threat of accidental friendly fire. Independently, Bledsoe's Battery also began firing at Sigel with its three cannons, drawing the return fire of Backof's Missouri Battery.[13] After the artillery duel, the 3rd Louisiana Infantry and the Missouri State Guard infantry attacked Sigel's position, driving the Union column from the field.[14] After Sigel's retreat, Confederate and Missouri State Guard forces were able to concentrate against Lyon's main attacking column. Lyon formed a defensive line on an elevation named Bloody Hill, repulsing multiple attacks. However, Lyon was killed during the fighting, and the Union troops retreated to Rolla in defeat.[15] Bledsoe's Battery's Wilson's Creek casualties are unknown.[16]
After Wilson's Creek, Price moved the Missouri State Guard northward.[15] A fourth cannon, a 6-pounder smoothbore captured from Sigel at Wilson's Creek, was added to Bledsoe's Battery's complement.[2] On September 2, the Missouri State Guard encountered Union troops commanded by Brigadier General James H. Lane near Dry Wood Creek. The ensuing Battle of Dry Wood Creek lasted an hour before Lane retreated from the field.[17] Bledsoe's Battery participated in the fighting.[2] Price advanced as far as the Missouri River town of Lexington, which was defended by a Union garrison.[18] When the Siege of Lexington began on September 12, Bledsoe's Battery, along with Guibor's Battery, provided artillery support as the Union soldiers were driven back from an outer position.[19] At this point, Bledsoe was temporarily out of action with a wound from Dry Wood Creek, and the battery was commanded by Captain Emmett MacDonald. That afternoon, the two batteries bombarded the Union fortifications from a range of 600 yards (550 m).[20] By September 18, the city was under siege in earnest, and Bledsoe's Battery, along with Guibor's Battery and Clark's Missouri Battery, kept the Union position under artillery fire.[21] Bledsoe returned to the unit; he ordered the battery to fire hot shot at the Masonic College building, which suffered heavy damage.[22] The Union garrison surrendered later that day. Price abandoned Lexington for southwestern Missouri in October, when Union reinforcements began to concentrate against his command.[23]
1862 edit

In February 1862, Price was forced out of Springfield by pressure for Union Major General Samuel R. Curtis. On March 2, Price combined his forces with those of McCulloch and Major General Earl Van Dorn to form the Army of the West. With Van Dorn in command, the Confederates moved towards Pea Ridge, Arkansas, where Curtis was encamped.[24] During the ensuing Battle of Pea Ridge, Bledsoe's Battery, which was still part of the Missouri State Guard, was commanded by Lieutenant Charles W. Higgins.[25] On the first day of the battle, March 7, Bledsoe's Battery was engaged in an artillery duel with the 1st Iowa Battery. Several other Confederate and Missouri State Guard batteries were engaged in the action: Guibor's Battery, Clark's Battery, Wade's Missouri Battery, and the 3rd Missouri Light Battery. The Iowa battery ran low on ammunition, had a cannon disabled, and was forced to retreat.[26] Later that day, as Price's infantry prepared to assault a Union position near the Elkhorn Tavern, Bledsoe's and Clark's batteries and the 3rd Missouri Light Battery shelled the Union position in an attempt to soften resistance. The barrage had a demoralizing effect on the Union troops, and Price's infantry was eventually able to capture the position.[27] The next day, a Union counterattack broke the Confederate line, and Bledsoe's Battery was part of the last stage of the Confederate defense. The battery resorted to firing fragments of metal such as pieces of chains and metal tools during the last moments of the defense.[28] As the Army of the West fled in retreat, Bledsoe's Battery was one of the last Confederate or Missouri State Guard units to leave the field.[29] Four men of Bledsoe's Battery were wounded at Pea Ridge.[2]
After the defeat at Pea Ridge, the battery accompanied the Army of the West when it was transferred across the Mississippi River into Tennessee. On April 21, while at Memphis, Bledsoe's Battery left the Missouri State Guard to join the Confederate States Army; another Missouri State Guard unit transferring to Confederate service was consolidated into Bledsoe's Battery at that time. By May 5, the battery had relocated to Corinth, Mississippi, where a muster was held; 53 men were members of the battery on that date.[2] The Army of the West, under the command of Price, began preparing for an offensive movement and occupied Iuka, Mississippi in September. Van Dorn was in the area with another force, and Union Major General Ulysses S. Grant moved against Price in an attempt to destroy the Army of the West before it could be joined by Van Dorn. Grant's plan consisted of a two-pronged attack: Major General E. O. C. Ord was to attack Price from the northwest, and Major General William S. Rosecrans was to attack from the south. However, Price attacked Rosecrans on September 19, bringing on the Battle of Iuka. An acoustic shadow prevented Ord from hearing the sounds of the battle, and Price was able to escape from the trap.[30] The next day, Bledsoe's Battery, which was not engaged at Iuka, was part of Price's rear guard as the Army of the West left the Iuka area.[2]
After his escape from Iuka, Price was able to join forces with Van Dorn. With Van Dorn in charge, the Confederates attacked Corinth, which was now held by Rosecrans, on October 3.[31] During the ensuing Second Battle of Corinth, Bledsoe's Battery was part of Brigadier General John C. Moore's brigade of Brigadier General Dabney Maury's division;[32] Maury's Division was in the center of the Confederate line.[33] During the afternoon of October 3, Guibor's Battery was involved in an artillery duel against Battery I and Battery K of the 1st Missouri Light Artillery. This smaller action soon grew to include 31 cannons, as Landis' Missouri Battery, Wade's Battery, Bledsoe's Battery, and five more Union guns joined the fray. Eventually, the Union pieces ran out of ammunition, and the Confederates were able to make an infantry charge.[34] The Confederates were able to drive the Union troops from their outer works into their inner works, but attacks against the inner works the next day failed. The Army of the West then retreated, barely escaping another Union trap at the Battle of Davis Bridge on October 6.[35] Bledsoe's Battery had suffered two casualties at Second Corinth.[36]
1863 edit
Bledsoe's Battery saw no more action until April 7, 1863, when it was part of a small skirmish at Thomas's Plantation, Mississippi. After that action, Bledsoe's Battery became part of Brigadier General John Gregg's brigade, with which the battery was briefly stationed at Port Hudson, Louisiana.[36] Meanwhile, Grant had landed a Union force at Bruinsburg, Mississippi in late April. After defeating Brigadier General John S. Bowen's division at the Battle of Port Gibson, Grant began moving his army towards Jackson, Mississippi.[37] In response, Gregg's brigade was sent from Port Hudson to Jackson via Osyka.[38] After arriving in Jackson, the brigade was sent by Lieutenant General John C. Pemberton to Raymond to scout Grant's movements.[39] On May 12, contact was made between Gregg's men and those of Union Major General James B. McPherson, bringing on the Battle of Raymond. At the beginning of the battle, Bledsoe's Battery and its three cannons, along with the 1st Tennessee Infantry Battalion, occupied a position that gave the battery a clear field of fire towards a bridge over Fourteenmile Creek.[40] When Union infantry neared the creek, Bledsoe's Battery opened fire, drawing return fire from the 8th Michigan Battery.[41] Later in the battle, one of the battery's guns overheated and exploded.[42] After Union pressure broke Gregg's left, Gregg disengaged and retreated towards Jackson. The next day, the Confederates entered the defenses of Jackson.[43] Bledsoe's Battery had been the only Confederate artillery unit present at the Battle of Raymond.[36] On May 14, the battery was present at the Battle of Jackson as part of General Joseph E. Johnston's army, but was only lightly engaged.[36]
After the defeat at Jackson, the battery was issued two 3-inch ordnance rifles and two 12-pounder howitzers to replace the battery's remaining original pieces.[36] In August, Rosecrans began a movement against Chattanooga, Tennessee, a vital rail junction. As part of his movement against the city, Rosecrans sent troops across the Tennessee River south of Chattanooga. This lead Confederate General Braxton Bragg to abandon the city on September 8 and retreat to La Fayette, Georgia. After receiving reinforcements, Bragg began to move his Army of Tennessee against Rosecrans. On September 18, the two armies bumped into each other near Chickamauga Creek. The Battle of Chickamauga began in earnest the next day.[44] At Chickamauga, Bledsoe's Battery was again part of Gregg's brigade.[45] The battery played a minor role in the contact action on the 18th; fire from the battery inadvertently killed a civilian.[46] On the next day, Bledsoe's Battery was supporting Gregg's brigade when the Confederates were attacked by Union Colonel Hans Christian Heg's brigade. Two other Confederate batteries were present, and Heg's brigade was quickly forced to retreat.[47] On the same day, Bledsoe's Battery also won an artillery duel against a Union battery, firing about 125 shots in the process. During the victory at Chickamauga, the battery suffered two casualties, leaving 71 men in the battery. On November 4, the battery was issued new cannons: four 12-pounder Napoleons.[36]
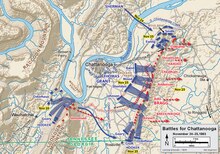
Meanwhile, Rosecrans' Army of the Cumberland retreated to Chattanooga after Chickamauga. Bragg pursued and promptly placed the city under siege. On October 17, Rosecrans, who was demoralized, was relieved of command and replaced by Major General George H. Thomas. While Chattanooga was not completely surrounded, Thomas' supply line was very thin. Grant himself arrived at the city of October 23, and expanded the tenuous supply line. After Major General William T. Sherman arrived with reinforcements, the Union troops went on the offensive. A Union victory at the Battle of Lookout Mountain broke part of Bragg's line on November 23. Two days later, Thomas attacked the Confederate line at Missionary Ridge. In the ensuing Battle of Missionary Ridge, the Confederate defenders were completely overrun and the siege was broken.[48] Bledsoe's Battery saw heavy action at Missionary Ridge, suffering a minimum of two casualties;[a] all four of the battery's cannons were captured.[36]
1864–1865 edit

In early 1864, the Army of Tennessee, now under the command of Johnston, was encamped in northern Georgia. In May, Sherman began moving a large force against Johnston, and attacked Johnston at the Battle of Rocky Face Ridge on May 7. A series of clashes continued through the 13th. Unable to carry Johnston's line via a frontal assault, Sherman outflanked Johnston's position, forcing the Confederates to fall back to Resaca.[49] By this point, Bledsoe's Battery had been rearmed with four 12-pounder Napoleons[36] and was part of the artillery of Lieutenant General William J. Hardee's corps.[50] Hardee's corps held the center of the Confederate line, which was attacked by Union troops commanded by Major General John M. Schofield during the inconclusive Battle of Resaca, which lasted from May 13 to 15.[51] Bledsoe's Battery saw significant action during the defense at Resaca.[36] On May 15, part of Sherman's army crossed the Oostanaula River beyond Johnston's left flank, and the Confederates again fell back.[52] Johnston made another stand near Dallas in late May, but was again outflanked after heavy fighting.[53] The Confederates eventually made a stand at Kennesaw Mountain, where they built strong defensive positions strengthened by abatis. Hardee's corps again held the center of the Confederate line. During the Battle of Kennesaw Mountain on June 27, Hardee's position was assaulted by some of Thomas' Union troops. The Union assaults all along the line were repulsed, but Sherman again used a flanking maneuver to leverage Johnston out of a defensive position.[54] Bledsoe's Battery saw heavy combat during the successful defense at Kennesaw Mountain;[36] it had previously received a resolution of thanks from the Confederate States Congress on May 23.[55]
On July 17, Johnston was relieved of command by Confederate President Jefferson Davis and replaced by General John Bell Hood. During late July, Hood made failed attacks against Sherman at the battles of Peachtree Creek and Ezra Church. By August, Hood was under siege in Atlanta; the Confederates abandoned the city on September 1.[56] From the beginning of the Atlanta campaign to the fall of the city, Bledsoe's Battery suffered 29 casualties.[36] In late September, Hood moved his army northwards in an attempt to disrupt Sherman's supply line, as Sherman was advancing further into Georgia.[57] Bledsoe's Battery accompanied the Army of Tennessee during this movement.[36] On November 30, Hood attacked a Union army commanded by Schofield at Franklin, Tennessee. In the ensuing Battle of Franklin, Hood's attacks were repulsed with heavy casualties in both enlisted men and officers. However, despite defeating Hood, Schofield withdrew his forces from Franklin to Nashville that night. Hood pursued to Nashville, and fortified positions in front of the city.[58] By this point, Bledsoe's Battery was part of the artillery of Major General Benjamin F. Cheatham's corps.[59] On the first day of the Battle of Nashville, December 15, Cheatham's division held the right of the Confederate line. Union attacks broke the left of the Confederate line, and Cheatham fell back to a new position in the rear.[60] On the next day, Cheatham held the Confederate left, which was harassed by Brigadier General James H. Wilson's Union cavalry.[61] Eventually, the Confederate line collapsed under Union pressure, and Hood's army fell back in shambles.[62] Bledsoe's Battery saw action during the rout at Nashville and served as part of Hood's rear guard during the retreat.[36]
As part of the rear guard, Bledsoe's Battery was engaged in a small fight at Franklin on December 16. Wilson's cavalry was pursuing Brigadier Randall L. Gibson's infantry brigade, which was in danger of being captured. The battery then fired its guns down one of the streets of Franklin in a successful attempt to buy time for Gibson to escape.[36] Bledsoe's Battery saw more action the next day, this time at a point 5 miles (8.0 km) north of Franklin. Two of Bledsoe's guns, along with infantry commanded by Brigadier Generals Marcellus Stovall and Edmund Pettus repulsed an attack made by the 10th Indiana Cavalry Regiment and the 19th Pennsylvania Cavalry Regiment.[63] Over the course of the retreat, the battery suffered four casualties. While much of the Army of Tennessee transferred to North Carolina after the retreat, Bledsoe's Battery remained in Georgia.[36] A request for equipment dated February 3 placed the unit at Macon.[64] On May 1, 1865, the battery surrendered while stationed at Augusta; the batterymen were sent to Nashville to receive paroles.[36] The rest of the Army of Tennessee had surrendered on April 26.[65]
Notes edit
References edit
- ^ Kennedy 1998, pp. 19–20.
- ^ a b c d e f McGhee 2008, p. 26.
- ^ Hinze & Farnham 2004, p. 117.
- ^ Hinze & Farnham 2004, pp. 130–131.
- ^ Hinze & Farnham 2004, p. 133.
- ^ Hinze & Farnham 2004, p. 140.
- ^ Hinze & Farnham 2004, pp. 151, 153.
- ^ Hinze & Farnham 2004, pp. 181–182.
- ^ Hinze & Farnham 2004, p. 185.
- ^ Kennedy 1998, pp. 20–21.
- ^ Kennedy 1998, p. 21.
- ^ Piston & Hatcher 2000, p. 252.
- ^ Piston & Hatcher 2000, p. 254.
- ^ Piston & Hatcher 2000, pp. 254–256.
- ^ a b Kennedy 1998, p. 23.
- ^ Piston & Hatcher 2000, p. 337.
- ^ Kennedy 1998, pp. 23–24.
- ^ Kennedy 1998, p. 24.
- ^ Wood 2014, pp. 40–41.
- ^ Wood 2014, p. 43.
- ^ Wood 2014, pp. 64, 70.
- ^ Wood 2014, p. 97.
- ^ Kennedy 1998, pp. 24–25.
- ^ Kennedy 1998, p. 34.
- ^ Shea & Hess 1992, pp. 337–339.
- ^ Shea & Hess 1992, pp. 162–164.
- ^ Shea & Hess 1992, pp. 198–203.
- ^ Shea & Hess 1992, pp. 251–252.
- ^ Shea & Hess 1992, p. 252.
- ^ Kennedy 1998, p. 129.
- ^ Kennedy 1998, p. 131.
- ^ Cozzens 1997, pp. 327–328.
- ^ Kennedy 1998, p. 130.
- ^ Cozzens 1997, pp. 204–205.
- ^ Kennedy 1998, pp. 131–132.
- ^ a b c d e f g h i j k l m n o p q McGhee 2008, p. 27.
- ^ Kennedy 1998, pp. 158, 164–166.
- ^ Ballard 2004, p. 256.
- ^ Ballard 2004, p. 259.
- ^ Ballard 2004, pp. 262–263.
- ^ Ballard 2004, p. 264.
- ^ Ballard 2004, p. 267.
- ^ Kennedy 1998, pp. 166–167.
- ^ Kennedy 1998, pp. 226–227, 230.
- ^ Cozzens 1996, p. 550.
- ^ Cozzens 1996, p. 105.
- ^ Cozzens 1996, pp. 199–200.
- ^ Kennedy 1998, pp. 243, 245–246.
- ^ Kennedy 1998, pp. 326–329.
- ^ Luvaas & Nelson 2008, p. 372.
- ^ Kennedy 1998, pp. 329–331.
- ^ Kennedy 1998, pp. 331.
- ^ Kennedy 1998, pp. 332–335.
- ^ Kennedy 1998, pp. 336–339.
- ^ Official Records 1891, p. 1008.
- ^ Kennedy 1998, pp. 339–343.
- ^ Kennedy 1998, pp. 389–390.
- ^ Kennedy 1998, pp. 395–397.
- ^ Horn 1991, p. 180.
- ^ Horn 1991, pp. 103–104.
- ^ Horn 1991, p. 124.
- ^ Kennedy 1998, p. 397.
- ^ Gottschalk 1991, p. 502.
- ^ Official Records 1897, p. 954.
- ^ Photographic History 1989, p. 262.
Sources edit
- Ballard, Michael B. (2004). Vicksburg: The Campaign that Opened the Mississippi. Chapel Hill, North Carolina: University of North Carolina Press. ISBN 0-8078-2893-9.
- Cozzens, Peter (1997). The Darkest Days of the War: The Battles of Iuka and Corinth. Chapel Hill, North Carolina: University of North Carolina Press. ISBN 0-8078-2320-1.
- Cozzens, Peter (1996) [1994]. This Terrible Sound: The Battle of Chickamauga (1st Paperback ed.). Urbana, Illinois: University of Illinois Press. ISBN 0-252-06594-8.
- Gottschalk, Phil (1991). In Deadly Earnest: The Missouri Brigade. Columbia, Missouri: Missouri River Press. ISBN 0-9631136-1-5.
- Hinze, David C.; Farnham, Karen (2004) [1997]. The Battle of Carthage: Border War In Southwest Missouri July 5, 1861 (First Pelican ed.). Gretna, Louisiana: Pelican Publishing. ISBN 1-58980-223-3.
- Horn, Stanley F. (1991) [1956]. The Decisive Battle of Nashville (Louisiana Paperback ed.). Baton Rouge, Louisiana: Louisiana State University Press. ISBN 0-8071-1709-9.
- Kennedy, Frances H., ed. (1998). The Civil War Battlefield Guide (2nd ed.). Boston/New York: Houghton Mifflin. ISBN 978-0-395-74012-5.
- Luvaas, Jay; Nelson, Harold W. (2008). Guide to the Atlanta Campaign. Lawrence, Kansas: University Press of Kansas. ISBN 978-0-7006-1570-4.
- McGhee, James E. (2008). Guide to Missouri Confederate Regiments, 1861–1865. Fayetteville, Arkansas: University of Arkansas Press. ISBN 978-1-55728-870-7.
- Piston, William Garrett; Hatcher, Richard W. (2000). Wilson's Creek: The Second Battle of the Civil War and the Men Who Fought It. Chapel Hill, North Carolina: University of North Carolina Press. ISBN 978-0-8078-5575-1.
- Shea, William L.; Hess, Earl J. (1992). Pea Ridge: Civil War Campaign in the West. Chapel Hill, North Carolina: University of North Carolina Press. ISBN 0-8078-4669-4.
- The Photographic History of the American Civil War. New York, New York: The Fairfax Press. 1989. ISBN 0-517-69266-X.
- The War of the Rebellion: A Compilation of the Official Records of the Union and Confederate Armies. Vol. 38. Washington, D.C.: United States Government Printing Office. 1891. OCLC 262466842.
- The War of the Rebellion: A Compilation of the Official Records of the Union and Confederate Armies. Vol. 49. Washington, D.C.: United States Government Printing Office. 1897. OCLC 262466842.
- Wood, Larry (2014). The Siege of Lexington: The Battle of the Hemp Bales. Charleston, South Carolina: The History Press. ISBN 978-1-62619-536-3.